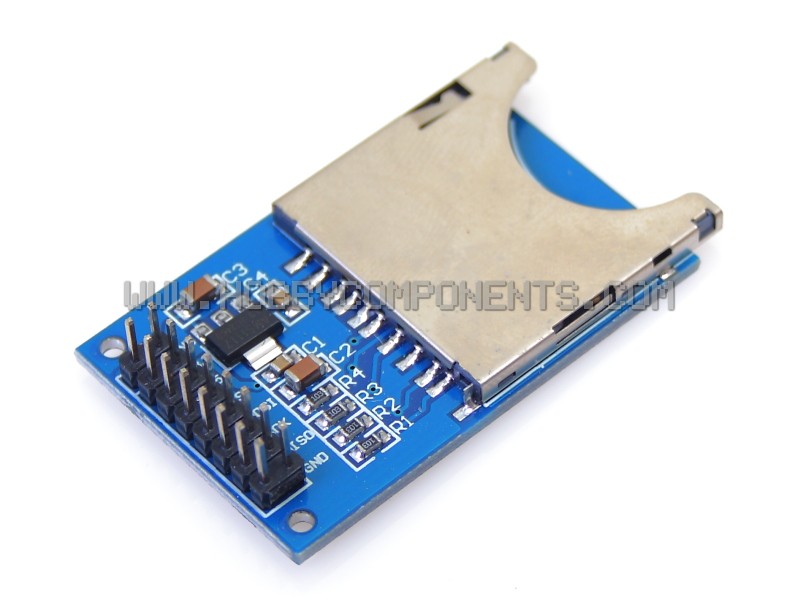
Features Allows reading and writing to an SD card from a microcontroller such as an Arduino development board.
Application Data logging, data storage
PLEASE NOTE that when used with 5V TTL an additional level shifter may be required to covert from 5V to 3.3V TTL levels (see HCCOIC0005) or for an alternative see item HCMODU0044.
- PINOUT
1.....GND
2.....+3.3V
3.....+5V
4.....CS
5.....MOSI
6.....SCK
7.....MISO
8.....GND
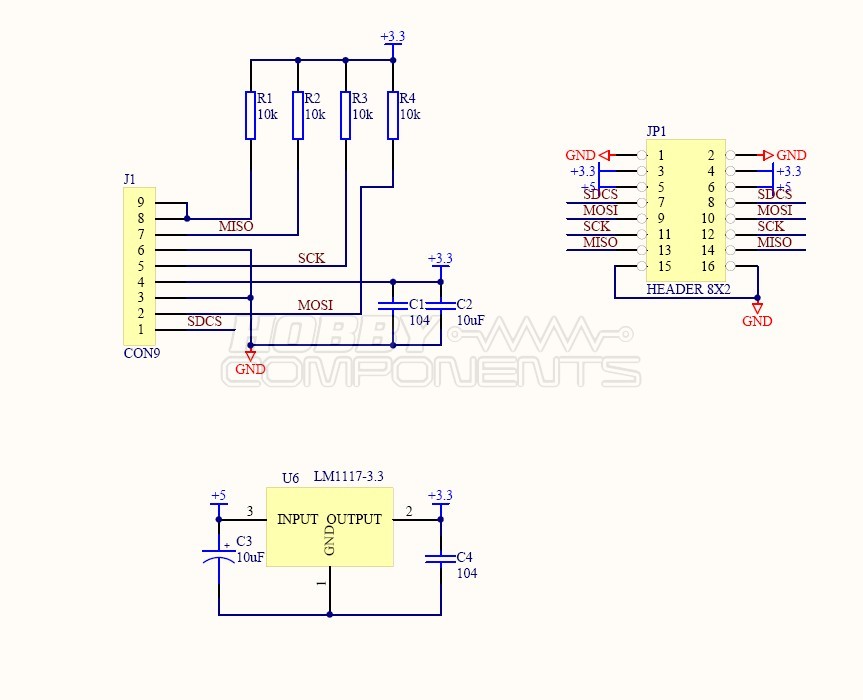
Schematic:

ARD_SD_CARD_MODULE_HCARDU0008_Write_Example.pde
Code: Select all
/* FILE:    ARD_SD_CARD_MODULE_HCARDU0008_Write_Example.pde
   DATE:    09/07/12
   VERSION: 0.1

REVISIONS:

09/07/12 Created version 0.1

01/08/12 Updated comments to include more instructions of how to
         interface to module.


This is an example of how to use the HobbyComponents SD card reader module
(HCARDU0008). This module allows reading and writing of data to a standard
SD card and is useful for applications such as data loggers where a large
amount of data needs to be stored. The module works with the standard
Arduino SD card library.

This example program will create a test file on the SD card called test.txt
If the file already exists it will first delete it and then create a new
one.

MODULE PINOUT:

PIN 1: GND    --->  Arduino GND
PIN 2: +3.3V  --->  N/A
PIN 3: +5V    --->  Arduino 5V
PIN 4: CS     --->  Arduino DIO 4
PIN 5: MOSI   --->  Arduino DIO 11
PIN 6: SCLK   --->  Arduino DIO 13
PIN 7: MISO   --->  Arduino DIO 12
PIN 8: GND    --->  N/A


IMPORTANT: The modules 5V pin supplies an onboard 3.3V regulator that powers
the SD card. The output of this regulator is brought out to the 3.3V pin. You
may power the module via the 5V or 3.3V pins but you must not supply power to
both as this could damage the on board regulator. If interfacing to the module
with 5V DIO it is recommended that you level shift the 5V DIO down to 3.3V
for the MOSI, SCLK, and CS pins. You can do this by using an appropriate level
shifter or a resistor divider. Disclaimer: We can not be held responsible for any
damage cause to an SD card by improper interfacing with the module.

You may copy, alter and reuse this code in any way you like, but please leave
reference to HobbyComponents.com in your comments if you redistribute this code.
This software may not be used directly for the purpose of selling products that
directly compete with Hobby Components Ltd's own range of products.

THIS SOFTWARE IS PROVIDED "AS IS". HOBBY COMPONENTS MAKES NO WARRANTIES,
WHETHER EXPRESS, IMPLIED OR STATUTORY, INCLUDING, BUT NOT LIMITED TO, IMPLIED
WARRANTIES OF MERCHANTABILITY AND FITNESS FOR A PARTICULAR PURPOSE, ACCURACY OR
LACK OF NEGLIGENCE. HOBBY COMPONENTS SHALL NOT, IN ANY CIRCUMSTANCES, BE LIABLE
FOR ANY DAMAGES INCLUDING, BUT NOT LIMITED TO, SPECIAL, INCIDENTAL OR
CONSEQUENTIAL DAMAGES FOR ANY REASON WHATSOEVER. */

/* Include the standard SD card library */
#include <SD.h>

#define SD_CARD_CD_DIO 4 /* DIO pin used to control the modules CS pin */

File SDFileData;

/* Initialise serial and DIO */
void setup()
{
  Serial.begin(9600);
  /* DIO pin used for the CS function. Note that even if you are not driving this
     function from your Arduino board, you must still configure this as an output
     otherwise the SD library functions will not work. */
  pinMode(10, OUTPUT);
}

/* Main program loop */
void loop()
{

  /* Initialise the SD card */
  if (!SD.begin(SD_CARD_CD_DIO))
  {
    /* If there was an error output this to the serial port and go no further */
    Serial.println("ERROR: SD card failed to initiliase");
    while(1);
  }else
  {
    Serial.println("SD Card OK");
  }


   /* Check if the text file already exists */
   while(SD.exists("test.txt"))
   {
     /* If so then delete it */
     Serial.println("test.txt already exists...DELETING");
     SD.remove("test.txt");
   }

  /* Create a new text file on the SD card */
  Serial.println("Creating test.txt");
  SDFileData = SD.open("test.txt", FILE_WRITE);

  /* If the file was created ok then add come content */
  if (SDFileData)
  {
    SDFileData.println("It worked !!!");

    /* Close the file */
    SDFileData.close();

    Serial.println("done.");
  }else
  {
      Serial.println("Error writing to file !");
  }

  /* Do nothing */
  while (1);
}
ARD_SD_CARD_MODULE_HCARDU0008_Read_Example.pde
Code: Select all
/* FILE:    ARD_SD_CARD_MODULE_HCARDU0008_Read_Example.pde
   DATE:    09/07/12
   VERSION: 0.1

REVISIONS:

09/07/12 Created version 0.1

01/08/12 Updated comments to include more instructions of how to
         interface to module.


This is an example of how to use the HobbyComponents SD card reader module
(HCARDU0008). This module allows reading and writing of data to a standard
SD card and is useful for applications such as data loggers where a large
amount of data needs to be stored. The module works with the standard
Arduino SD card library.

This example program will attempt to read a text file named text.txt and
output its contents to the serial port.

MODULE PINOUT:

PIN 1: GND    --->  Arduino GND
PIN 2: +3.3V  --->  N/A
PIN 3: +5V    --->  Arduino 5V
PIN 4: CS     --->  Arduino DIO 4
PIN 5: MOSI   --->  Arduino DIO 11
PIN 6: SCLK   --->  Arduino DIO 13
PIN 7: MISO   --->  Arduino DIO 12
PIN 8: GND    --->  N/A

IMPORTANT: The modules 5V pin supplies an onboard 3.3V regulator that powers
the SD card. The output of this regulator is brought out to the 3.3V pin. You
may power the module via the 5V or 3.3V pins but you must not supply power to
both as this could damage the on board regulator. If interfacing to the module
with 5V DIO it is recommended that you level shift the 5V DIO down to 3.3V
for the MOSI, SCLK, and CS pins. You can do this by using an appropriate level
shifter or a resistor divider. Disclaimer: We can not be held responsible for any
damage cause to an SD card by improper interfacing with the module.


You may copy, alter and reuse this code in any way you like, but please leave
reference to HobbyComponents.com in your comments if you redistribute this code.
This software may not be used directly for the purpose of selling products that
directly compete with Hobby Components Ltd's own range of products.

THIS SOFTWARE IS PROVIDED "AS IS". HOBBY COMPONENTS MAKES NO WARRANTIES,
WHETHER EXPRESS, IMPLIED OR STATUTORY, INCLUDING, BUT NOT LIMITED TO, IMPLIED
WARRANTIES OF MERCHANTABILITY AND FITNESS FOR A PARTICULAR PURPOSE, ACCURACY OR
LACK OF NEGLIGENCE. HOBBY COMPONENTS SHALL NOT, IN ANY CIRCUMSTANCES, BE LIABLE
FOR ANY DAMAGES INCLUDING, BUT NOT LIMITED TO, SPECIAL, INCIDENTAL OR
CONSEQUENTIAL DAMAGES FOR ANY REASON WHATSOEVER. */

/* Include the standard SD card library */
#include <SD.h>

#define SD_CARD_CD_DIO 4 /* DIO pin used to control the modules CS pin */

File SDFileData;

/* Initialise serial and DIO */
void setup()
{
  Serial.begin(9600);
  /* DIO pin uesd for the CS function. Note that even if you are not driving this
     function from your Arduino board, you must still configure this as an output
     otherwise the SD library functions will not work. */
  pinMode(10, OUTPUT);
}

/* Main program loop */
void loop()
{

  /* Initiliase the SD card */
  if (!SD.begin(SD_CARD_CD_DIO))
  {
    /* If there was an error output this to the serial port and go no further */
    Serial.println("ERROR: SD card failed to initiliase");
    while(1);
  }else
  {
    Serial.println("SD Card OK");
  }


   /* Check if the text file exists */
   if(SD.exists("test.txt"))
   {
     Serial.println("test.txt exists, attempting to read file...");

     /* The file exists so open it */
     SDFileData = SD.open("test.txt");

     /* Sequentially read the data from the file and output it's
        contents to the UART */
     while (SDFileData.available())
     {
       Serial.write(SDFileData.read());
     }

     /* Close the file */
     SDFileData.close();
   }


  /* Do nothing */
  while (1);
} 