

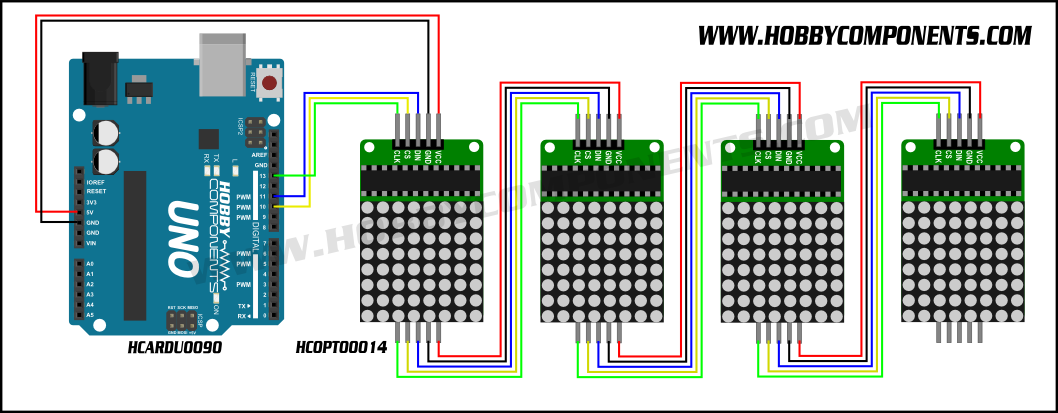
This 8x8 serial dot matrix LED module (HCOPTO0014) allows you to experiment with dot matrix LED's without all the complicated wiring. The module makes use of the MAX7219 serial matrix LED driver which handles all the complicated stuff such as multiplexing the LEDs and driving them at the correct currents. What's more, the modules can be daisy-chained to make larger LED displays whilst still only requiring 3 digital control pins. The PCB has no overhang on the sides of the matrix module so modules can be positioned side by side with no gaps to make one continuous display.
To make controlling this display from an Arduino as simple as possible we have also created an exclusive library which will allow you to display text and numbers and even create a scrolling message display.
Item includes:
Pre-soldered serial dot matrix module with an 8x8 red led module.
5 way female to female Dupont cable for interconnecting multiple displays.

Model number: HCOPTO0014
Working voltage: 5V
Max current: ~300mA (All LEDs on & set to maximum intensity)
Dimensions: 5 cm x 3.2 cm wide x 1.5 cm high
4 fixing screw holes measuring 3 mm
Input and output interface, support for multiple module cascade

Pin..........Input..........Output
1.............VCC (5V)....VCC
2.............GND..........GND
3.............DIN...........DOUT
4.............CS.............CS
5.............CLK...........CLK

Code: Select all
/* FILE:    HCMODU0082_Serial_Dot_Matrix_Example
   DATE:    19/03/15
   VERSION: 0.1

REVISIONS:

19/03/15 Created version 0.1

This is an example of how to use the Hobby Components 8x8 serial dot matrix
module (HCOPTO0014). To use this example sketch you will need to download
and install the HCMAX7921 library available from the software section of our
support forum (forum.hobbycomponents.com) or on github:
(https://github.com/HobbyComponents)

The library assumes you are using one module. If you have more than one module
connected together then you will need to change the following line in the
libraries HCMAX7219.h header file to the number of drivers you have connected:

#define NUMBEROFDRIVERS 1 <- Change this number

PINOUT:

MODULE.....UNO/NANO.....MEGA
VCC........+5V..........+5V
GND........GND..........GND
DIN........11...........51
CS (LOAD)..10...........10
CLK........13...........52

You may copy, alter and reuse this code in any way you like, but please leave
reference to HobbyComponents.com in your comments if you redistribute this code.
This software may not be used directly for the purpose of promoting products that
directly compete with Hobby Components Ltd's own range of products.

THIS SOFTWARE IS PROVIDED "AS IS". HOBBY COMPONENTS MAKES NO WARRANTIES,
WHETHER EXPRESS, IMPLIED OR STATUTORY, INCLUDING, BUT NOT LIMITED TO, IMPLIED
WARRANTIES OF MERCHANTABILITY AND FITNESS FOR A PARTICULAR PURPOSE, ACCURACY OR
LACK OF NEGLIGENCE. HOBBY COMPONENTS SHALL NOT, IN ANY CIRCUMSTANCES, BE LIABLE
FOR ANY DAMAGES INCLUDING, BUT NOT LIMITED TO, SPECIAL, INCIDENTAL OR
CONSEQUENTIAL DAMAGES FOR ANY REASON WHATSOEVER. */

/* Include the HCMAX7219 and SPI library */
#include <HCMAX7219.h>
#include "SPI.h"

/* Set the LOAD (CS) digital pin number*/
#define LOAD 10

/* Create an instance of the library */
HCMAX7219 HCMAX7219(LOAD);


void setup()
{
  HCMAX7219.Init();
}


/* Main program */
void loop()
{
  byte Loopcounter;
  int Position;

  /* Clear the output buffer */
  HCMAX7219.Clear();

  /* SCROLL SOME TEXT 2 TIMES BEFORE MOVING ON */
  for (Loopcounter = 0; Loopcounter <= 2; Loopcounter++)
  {
    for(Position=0; Position <= 64; Position++)
    {
      HCMAX7219.printMatrix("HELLO!! ", Position);
      HCMAX7219.Refresh();
      delay(80);
    }
  }


  /* SCROLL SOME INVERTED TEXT 2 TIMES BEFORE MOVING ON */
  HCMAX7219.Invert(INVERTON);
  for (Loopcounter = 0; Loopcounter <= 2; Loopcounter++)
  {
    for(Position=0; Position <= 64; Position++)
    {
      HCMAX7219.Clear();
      HCMAX7219.printMatrix("HELLO!! ", Position);
      HCMAX7219.Refresh();
      delay(80);
    }
  }
  HCMAX7219.Invert(INVERTOFF);


  /* SCROLL AND INTEGER NUMBER */
  for(Position=0; Position <= 80; Position++)
  {
    HCMAX7219.Clear();
    HCMAX7219.printMatrix(-12345678, Position);
    HCMAX7219.Refresh();
    delay(80);
  }


  /* SCROLL AND INTEGER NUMBER WITH DECIMAL PLACE */
  for(Position=0; Position <= 96; Position++)
  {
    HCMAX7219.Clear();
    HCMAX7219.printMatrix(-12345678, 2, Position);
    HCMAX7219.Refresh();
    delay(80);
  }

}
FAQ:
Do you have a Arduno library for this module?
Edit: Yes see below...
How much current does each module require?
With all 64 LED's turned on and at full brightness (there are 16 brightness levels) each module will draw ~300mA of current.

HCMAX7921 Arduino library for above sketch is available for download from the software section of our support forum here:
http://forum.hobbycomponents.com/viewto ... =58&t=1794
Or from github here:
https://github.com/HobbyComponents/HCMAX7219