
Library for driving 8x8 LED dot matrix modules. This Arduino library was written
to support the following Hobby Components product(s):
8x8 Red LED Matrix Module (HCOPTO0011)
8x8 Mini 20mm 8x8 Red LED Matrix (HCOPTO0067)
REVISIONS:
05/09/17 V2.0: New version - complete rewrite of previous version.
Now refreshes the screen in the background using timer interrupt 2.
UpdateMatrix() function removed as no longer required.
Added init() function (must be run once at beginning of sketch).
print() function now supports printing of floating point numbers.
Added printChar() function allowing printing of single ASCII characters.
Added clear() function to clear the module buffer and display.
Added setLED() function to turn on an individual LED from an X/Y coordinate.
Added clearLED() function to turn off an individual LED from an X/Y coordinate.
Added getLED() function to get the current state of one of the modules LEDs.
Added invert() function to reverse the state of the LEDs.
19/09/13 Created version 0.1
You will need to download (please log in to download the library) and unzip this library to the Arduino development environments library area.
On Windows:
My Documents\Arduino\libraries\
On Mac:
Documents/Arduino/libraries/
Linux:
Usually found within the users home area under /Arduino/libraries/
Using the HCDotMatrix library
To use the library just include the HCDotMatrix.h header file and create an instance of the HCDotMatrix library. E.g:
Code: Select all
#include "HCDotMatrix.h"
HCDotMatrix HCDotMatrix(R0,R1,R2,R3,R4,R5,R6,R7,C0,C1,C2,C3,C4,C5,C6,C7);To initialise the library add the following line to the setup() section of your sketch:
Code: Select all
HCDotMatrix.init(Module_Type);COMMON_CATHODE
COMMON_ANODE
The following functions are available with this library:
void print(char TextString[], unsigned int Offset);
Prints a string of text to the module starting at a specified column position where:
TextString[] is a character array containing the text to print.
Offset is the column position from where the text will start from. Valid values are from 0 to 65535 (Uno/Nano etc) where:
1 = right most column
8 = left most column
Values above 8 will start the text at a column beyond the left most column.
Example:
Code: Select all
for(byte Column = 0; Column < 168; Column++)
{
    HCDotMatrix.clear();
    HCDotMatrix.print("HobbyComponents.com", Column);
    delay(50);
}
void print(float Value, unsigned int Offset = 8, byte DP = 2);
Prints a floating point number to the module starting at a specified position where:
Value is the number to print.
Offset (optional) is the column position from where the value will start from. Valid values are from 0 to 65535 (Uno/Nano etc) where:
1 = right most column
8 = left most column
Values above 8 will start the text at a column beyond the left most column.
DP (optional) specifies the number of decimal places to display a floating point number to.
Example:
Code: Select all
for(byte Number = 0; Number <= 9; Number++)
  {
    HCDotMatrix.print(Number);
    delay(1000);
  }
void printChar(char Character, byte Offset = 8);
Prints a single ASCII character to the module starting at a specified position where:
Character is the ASCII character to print.
Offset (optional) is the column position from where the character will start from. Valid values are from 0 to 65535 (Uno/Nano etc) where:
1 = right most column
8 = left most column
Values above 8 will start the text at a column beyond the left most column.
Example:
Code: Select all
HCDotMatrix.printChar('A');void clear(void);
Clears any data in the module buffer therefore turning off all LEDs on the module.
Example:
Code: Select all
HCDotMatrix.clear();void setLED(byte X, byte Y);
Tuns on an LED at the specified X & Y coordinate where:
X is the column coordinate (0 = left most & 7 = right most column)
Y is the row coordinate (0 = top row & 7 = bottom row)
Example:
Code: Select all
HCDotMatrix.setLED(0, 0);void clearLED(byte X, byte Y);
Tuns off an LED at the specified X & Y coordinate where:
X is the column coordinate (0 = left most & 7 = right most column)
Y is the row coordinate (0 = top row & 7 = bottom row)
Example:
Code: Select all
HCDotMatrix.clearLED(0, 0);boolean getLED(byte X, byte Y);
Gets the state of an LED at the specified X & Y coordinate where:
X is the column coordinate (0 = left most & 7 = right most column)
Y is the row coordinate (0 = top row & 7 = bottom row)
Returns a boolean true/false value representing the on/off state of the LED.
Example:
Code: Select all
boolean State = HCDotMatrix.getLED(0, 0);void invert(void);
Inverts the on/off state of the LEDs
Example:
Code: Select all
boolean State = HCDotMatrix.invert();
Code: Select all
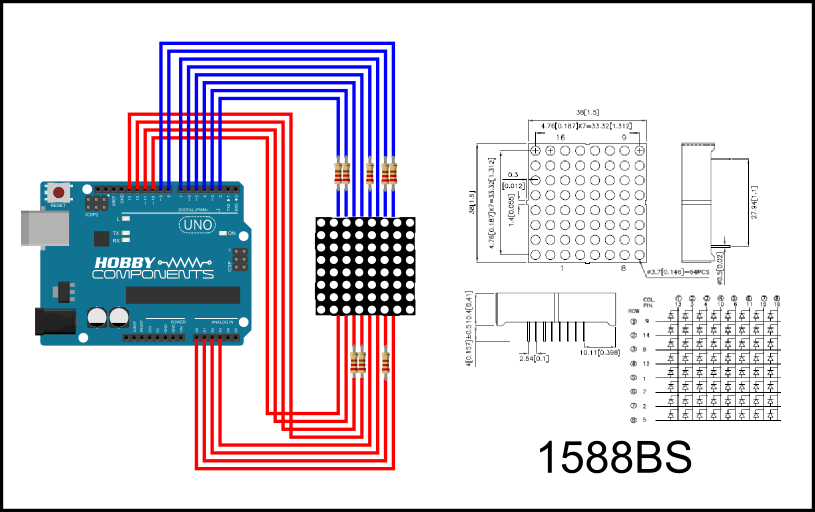
// DIO pins used to drive module. Change the pin numbers to match your connections
#define ROW1  2
#define ROW2  9
#define ROW3  17
#define ROW4  3
#define ROW5  10
#define ROW6  16
#define ROW7  11
#define ROW8  12

#define COL1  6
#define COL2  13
#define COL3  14
#define COL4  4
#define COL5  15
#define COL6  5
#define COL7  7
#define COL8  8


#include "HCDotMatrix.h"

HCDotMatrix HCDotMatrix(ROW1,ROW2,ROW3,ROW4,ROW5,ROW6,ROW7,ROW8,
                        COL1,COL2,COL3,COL4,COL5,COL6,COL7,COL8);

void setup()
{
  //Initialise the library. If your module is a common anode type then change
  //COMMON_CATHODE to COMMON_ANODE
  HCDotMatrix.init(COMMON_CATHODE);
}


void loop()
{
  //Display numbers 0 to 9
  for(byte Number = 0; Number <= 9; Number++)
  {
    HCDotMatrix.print(Number);
    delay(1000);
  }

  delay(1000);


  //Flash the display using the invert() library function
  for(byte i = 0; i < 20; i++)
  {
    HCDotMatrix.invert();
    delay(100);
  }


  //Scroll some text.
  for(byte Column = 0; Column < 168; Column++)
  {
    HCDotMatrix.clear();
    HCDotMatrix.print("HobbyComponents.com", Column);
    delay(50);
  }

  delay(1000);
}
Version 2.0:
Old version 0.1:
Diagrams, libraries, and example code are provided as an additional free service by Hobby Components and are not sold as part of this product. We do no provide any guarantees or warranties as to their accuracy or fitness for purpose.
Descriptions and diagrams on this page are copyright Hobby Components Ltd and may not be reproduced without permission.