
See our Tiny Circuits Range Here.

This TinyShield lets you add some control to your TinyDuino projects, like remote controlling a robot or playing a video game with your TinyScreen. This TinyShield has two analogue joysticks on both sides, plus two push buttons along the top, to create a tiny joystick controller for your TinyDuino. This TinyShield uses the I2C bus for communication and can safely run over the full TinyDuino voltage range.

Ultra compact size and weight
Dimensions: 68mm x 25mm (2.68 inches x .984 inches)
Max Height (from lower bottom TinyShield Connector to upper top of joysticks): 12.0 mm (0.472 inches)
Weight: 5.95 grams (.21 ounces)
Built in ATTiny88 microcontroller, preprogrammed
Two Analogue Joysticks, 10-bit ADC reading for each axis of each joystick returned
Two discrete push buttons
I2C Mode used
Arduino pins A4 and A5 are used by this shield
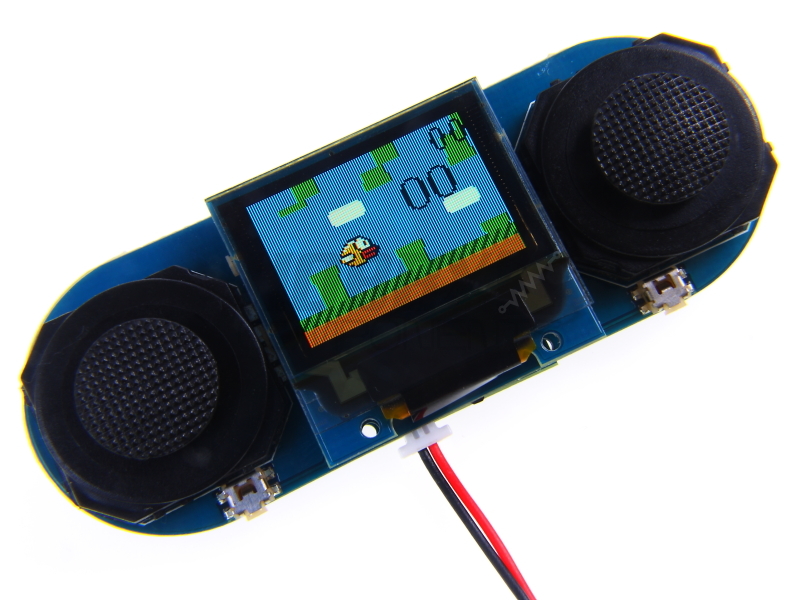
OLED screen and processor board not included

Code: Select all
/* FILE:    TinyDuino_Joystick_Adapter_Example
   DATE:    14/10/15
   VERSION: 0.1

REVISIONS:

14/10/15 Created version 0.1

This is an example of how to use the TinyCircuits TinyShield HCTICI0026 / ASD2020
Joystick adapter. The sketch will output the current state of the joysticks imputs
to the serial port. You will therefore require a USB adaptor shiled to run this test.

THIS SOFTWARE IS PROVIDED "AS IS". HOBBY COMPONENTS MAKES NO WARRANTIES, WHETHER
EXPRESS, IMPLIED OR STATUTORY, INCLUDING, BUT NOT LIMITED TO, IMPLIED WARRANTIES OF
MERCHANTABILITY AND FITNESS FOR A PARTICULAR PURPOSE, ACCURACY OR LACK OF NEGLIGENCE.
HOBBY COMPONENTS SHALL NOT, IN ANY CIRCUMSTANCES, BE LIABLE FOR ANY DAMAGES,
INCLUDING, BUT NOT LIMITED TO, SPECIAL, INCIDENTAL OR CONSEQUENTIAL DAMAGES FOR ANY
REASON WHATSOEVER. */

/* The joystick shield has an I2C address of 0x22 */
#define JOYSTICK_ADD 0x22

#include <SPI.h>
#include <Wire.h>

unsigned int JR_XAxis, JR_YAxis, JL_XAxis, JL_YAxis;
boolean JL_Button, JR_Button;


void setup(void)
{
  Wire.begin();
  Serial.begin(9600);
}

/* Main loop */
void loop()
{
  /* Get the current state of the joystick shield */
  Read_Joystick();

  Serial.print("Left X: ");
  Serial.print(JL_XAxis);
  Serial.print(" : Left Y: ");
  Serial.print(JL_YAxis);
  Serial.print(" : Right X: ");
  Serial.print(JR_XAxis);
  Serial.print(" : Right Y: ");
  Serial.print(JR_YAxis);

  if(JL_Button)
    Serial.print (" LEFT BUTTON");

  if(JR_Button)
    Serial.print (" RIGHT BUTTON");

  Serial.println("");
  delay(100);
}

/* Reads the state of rht ejoystick inputs via its I2C interface */
void Read_Joystick()
{
  byte index, button, JY_lsb;

  /* Get 6 bytes of data from the shield */
  Wire.requestFrom(JOYSTICK_ADD, 6);

  JR_XAxis = Wire.read() << 2;
  JR_YAxis = Wire.read() << 2;
  JL_XAxis = Wire.read() << 2;
  JL_YAxis = Wire.read() << 2;

  JY_lsb = Wire.read();
  button = ~Wire.read();

  JL_Button = button & 0x04;
  JR_Button = button & 0x08;

  JR_XAxis |= (JY_lsb & 0x03);
  JR_YAxis |= ((JY_lsb >> 2) & 0x03);
  JL_XAxis |= ((JY_lsb >> 4) & 0x03);
  JL_YAxis |= ((JY_lsb >> 6) & 0x03);
}