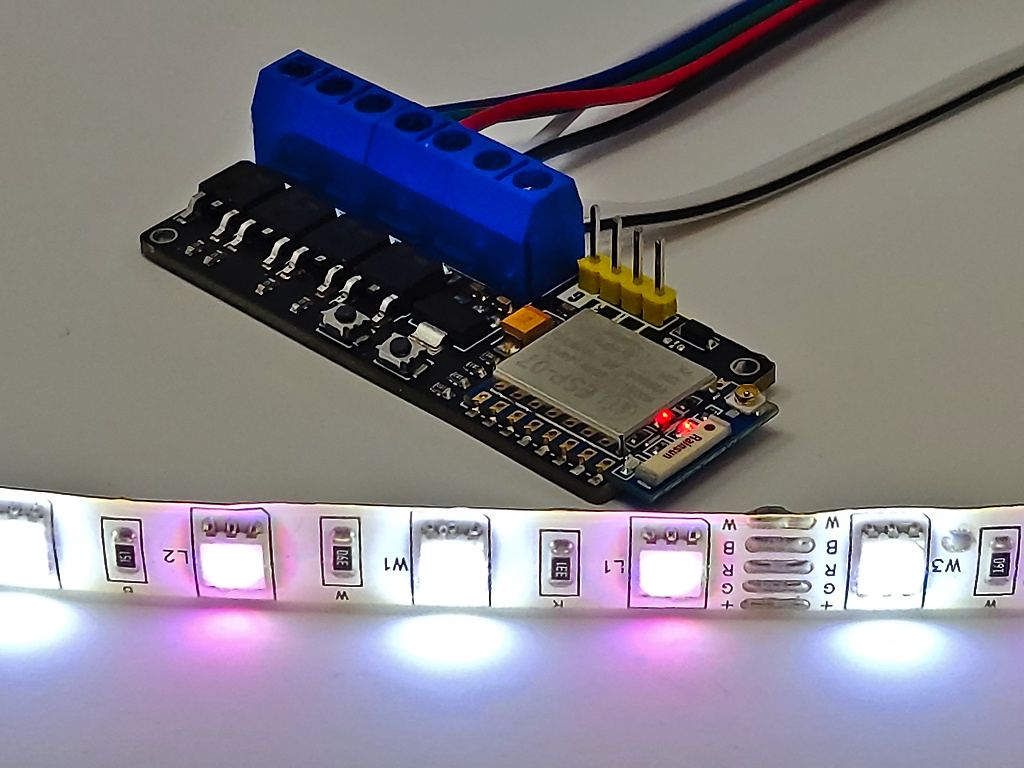
ESP-ARGB Controller With WLED firmware (HCMODU0234)

Post Reply
admin
Site Admin
Posts: 880
Joined: Sun Aug 05, 2012 4:02 pm

ESP-ARGB Controller With WLED firmware (HCMODU0234)

Post by admin » Wed Dec 07, 2022 4:41 pm

Image


The ESP-ARGB is a general purpose RGB or RGB+W LED light controller based on the popular Expressive ESP8266 wireless microcontroller. It combines an ESP8266 ESP-07 wireless module with four MOSFET transistors. These transistors are connected to the ESPs PWM output pins making it easy to perform independent power control of up to 4 connected devices. Each transistor can switch up to a maximum current of 2A and a maximum voltage of 12V DC.

The module comes shipped with the WLED firmware pre-installed so out of the box it is ready to connect to your WiFi network and controlled via the WLED Android or iOS, or even via a web browser on your computer. Just connect your LED strip and power supply to the module and you're ready to go. Additionally as the module runs the WLED firmware it is also compatible with home automation software such as Home Assistant.


				Image
				WLED app main screen


Alternatively, if you wish to write your own firmware it is compatible with the Arduino IDE (requires an additional USB to serial adapter for uploading sketches). From the Arduino IDE the transistors can be controlled using just the standard Arduino digitalWrite() and analogWrite() commands.

Although the module is designed primarily for driving standard RGB or RGBW LED lighting strips it can be used to drive any other device that can be switched via a transistor (-Ve switched). For example the module can be used as a DC motor speed controller for up to 4 motors.

Programming can be achieved via the modules serial interface. Please note: To program the module via a PC an additional USB to serial / FTDI adapter will be required. To simplify the programming process the module comes fitted with program and reset buttons allowing it to be manually put in and out of programming mode. For instructions on how to program via the Arduino IDE please see forum post.


Specifications:

Product code: 										HCMODU0234
Supply Voltage (Via +/- screw terminals): 					5 to 12V DC
Module current consumption (Sleep): 					10mA
Module current consumption (connected to WiFi network): 	215mA 
ARGB driver: 										2A per channel / 6A combined, -Ve switching (0.9V Vf)
PWM resolution: 									8bits (256 levels)
Interfaces: 										4x MOSFET drivers + power via screw terminals, serial programming interface, program and reset buttons.
ESP8266 type: 										ESP-07 
ESP8266 clock: 										80MHz
ESP8266 Flash: 										8Mbit
ESP8266 Transmit power: 								802.11b: 16±2 dBm (11Mbps)
												802.11g: 14±2 dBm (54Mbps)
												802.11n: 13±2 dBm (HT20, MCS7)
Dimensions (LxWxH): 								62.5mm x 23mm x 14mm


Example 12V RGBW light strip connection:


Image


The module can drive 12V RGB light strips at up to 2A per channel. If your light strip has an additional white input this can be connected to the driver A (aux) terminal.

A single power supply for both the module and light strip can be connected to the modules + and - screw terminal inputs (!12V max).


Arduino IDE setup guide:

The module is compatible with the Arduino IDE via the board manager feature. The latest version of the Arduino IDE can be downloaded from the official Arduino website here:

https://www.arduino.cc/en/software

Once installed you will need to add board support for ESP8266 devices. To do this just follow steps 1 & 2 in our blog post here:

[https://blog.hobbycomponents.com/?p=937]


Arduino IDE board settings:


Board: 			Generic ESP8266 Module
Port: 			The COM port of your USB interface module.
Crystal Frequency: 	26MHz 
Flash Frequency: 	40MHz
Flash mode: 		DIO
Reset Method: 		dtr
Upload Speed: 		115200
Flash Size: 		1MB (FS64KB OTA:~470KB)
CPU Frequency: 	80MHz


You can leave any additional settings to their defaults.


Programming the ESP-ARGB

To interface this module to your PC you will need an additional USB to serial interface adapter. The serial interface is compatible with both 3.3V and 5V TTL adapters:

https://hobbycomponents.com/usb-interfa ... al-adaptor
https://hobbycomponents.com/usb-interfa ... rt-adapter
https://hobbycomponents.com/usb-interfa ... le-adaptor

Image


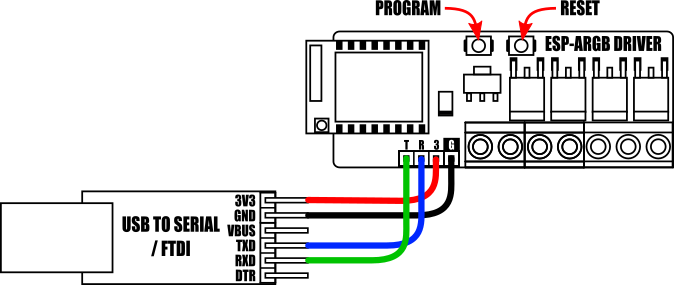
Connect the USB to serial adapter to the module's serial interface as shown above.

Note, if the module is powered from the + & - screw terminals the 3V pin (labelled 3) on the modules serial header becomes a 3.3V output. Therefore in this configuration do not connect the serial interfaces 3.3V supply pin to the module.

To upload a sketch from the Arduino IDE the module must first be manually put into programming mode. To do this, locate the modules PROGRAM and RESET buttons (see diagram above), then hold down the PROGRAM button whilst pressing and then releasing the RESET button.

The module will now be in programming mode and will stay in this mode until the module is reset or power is removed.

After uploading your sketch the module can be put back into run mode by pressing the RESET button.


Example Sketches:

Basic example

Basic analogWrite example:

This sketch uses the standard Arduino IDEs analogWrite() function to control the RGBW outputs
  1. // ARGB control pins
  2. #define PIN_R 13
  3. #define PIN_G 12
  4. #define PIN_B 5
  5. #define PIN_A 4
  6.  
  7.  
  8. void setup()
  9. {
  10.   // Initialise the driver output pins
  11.   pinMode(PIN_R, OUTPUT);
  12.   pinMode(PIN_G, OUTPUT);
  13.   pinMode(PIN_B, OUTPUT);
  14.   pinMode(PIN_A, OUTPUT);
  15.   analogWrite(PIN_A, 0);
  16.   analogWrite(PIN_R, 0);
  17.   analogWrite(PIN_G, 0);
  18.   analogWrite(PIN_B, 0);
  19. }
  20.  
  21.  
  22. void loop()
  23. {
  24.   // Set ARGB output to red
  25.   analogWrite(PIN_A, 0);
  26.   analogWrite(PIN_R, 255);
  27.   delay(1000);
  28.  
  29.   // Set ARGB output to green
  30.   analogWrite(PIN_R, 0);
  31.   analogWrite(PIN_G, 255);
  32.   delay(1000);
  33.  
  34.   // Set ARGB output to blue
  35.   analogWrite(PIN_G, 0);
  36.   analogWrite(PIN_B, 255);
  37.   delay(1000);
  38.  
  39.   // Set ARGB output to white
  40.   analogWrite(PIN_B, 0);
  41.   analogWrite(PIN_A, 255);
  42.   delay(1000);
  43. }

MQTT Example

Control RGBW LEDs via MQTT:

This sketch demonstrates how to remotely control the outputs via a MQTT broker
  1. /* ESP8266_ARGB MQTT Example
  2.  
  3.    This sketch requires the MQTT PubSubClient library to be installed.
  4.    This can be installed via the Arduino IDEs library manager or can be
  5.    downloaded from here:
  6.  
  7.    https://github.com/knolleary/pubsubclient/archive/master.zip
  8.  
  9.    This sketch will also need access to an MQTT server (broker) such as
  10.    mosquitto (https://mosquitto.org/)
  11. */
  12.  
  13. #include <PubSubClient.h>
  14. #include <ESP8266WiFi.h>
  15.  
  16. // ARGB control pins
  17. #define PIN_R 13      // Red pin
  18. #define PIN_G 12      // Green pin
  19. #define PIN_B 5       // Blue pin
  20. #define PIN_A 4       // White (Aux) pin
  21.  
  22.  
  23. // Network settings. EDIT THESE TO MATCH YOUR NETWORK
  24. #define MQTT_SERVER "xxx.xxx.xxx.xxx"    // IP address of your MQTT broker
  25. const char* ssid = "Your WiFi SSID";    // Your routers SSID
  26. const char* password = "Your WiFi password";    // Your routers WiFi password
  27.  
  28. // MQTT Topics for each colour
  29. char* r_topic = "/r";
  30. char* g_topic = "/g";
  31. char* b_topic = "/b";
  32. char* a_topic = "/a";
  33.  
  34.  
  35. WiFiClient wifiClient;
  36.  
  37. // Function prototypes
  38. void callback(char* topic, byte* payload, unsigned int length);
  39. void reconnect(void);
  40. String macToStr(const uint8_t* mac);
  41. byte strToByte(byte *str, byte length);
  42.  
  43. // Create an instance of the PubSubClient library
  44. PubSubClient client(MQTT_SERVER, 1883, callback, wifiClient);
  45.  
  46.  
  47. void setup()
  48. {
  49.   // Initialise the driver output pins
  50.   pinMode(PIN_R, OUTPUT);
  51.   pinMode(PIN_G, OUTPUT);
  52.   pinMode(PIN_B, OUTPUT);
  53.   pinMode(PIN_A, OUTPUT);
  54.   digitalWrite(PIN_R, 0);
  55.   digitalWrite(PIN_G, 0);
  56.   digitalWrite(PIN_B, 0);
  57.   digitalWrite(PIN_A, 0);
  58.  
  59.    
  60.   // Start the serial for debugging
  61.   Serial.begin(115200);
  62.   delay(100);
  63.  
  64.   // Start the WiFi subsystem
  65.   WiFi.begin(ssid, password);
  66.  
  67.   // Connect to the WIFI network and then connect to the MQTT server
  68.   reconnect();
  69.  
  70.   // Wait a bit before starting the main loop
  71.   delay(2000);
  72. }
  73.  
  74.  
  75.  
  76. void loop()
  77. {
  78.  
  79.   // If we lose connection try to reconnect
  80.   if (!client.connected() && WiFi.status() == 3)
  81.     reconnect();
  82.  
  83.   // Keep the MQTT connection alive
  84.   client.loop();
  85.  
  86.   // Small delay to allow ESP8266 WiFi functions to run in the background
  87.   delay(10);
  88. }
  89.  
  90.  
  91. // MQTT callback function
  92. void callback(char* topic, byte* payload, unsigned int length)
  93. {
  94.   // Convert the received topic to a string to make it easier to work with
  95.   String topicStr = topic;
  96.  
  97.   // Print out some debugging info
  98.   Serial.print("Topic: ");
  99.   Serial.println(topicStr);
  100.  
  101.   // If topic is /r then update the red output
  102.   if(topicStr == r_topic)
  103.   {
  104.     byte r = strToByte(payload, length);
  105.  
  106.     Serial.print("Red level: ");
  107.     Serial.println(r);
  108.     analogWrite(PIN_R, r);
  109.   }
  110.  
  111.   // If topic is /g then update the green output
  112.   if(topicStr == g_topic)
  113.   {
  114.     byte g = strToByte(payload, length);
  115.  
  116.     Serial.print("Green level: ");
  117.     Serial.println(g);
  118.     analogWrite(PIN_G, g);
  119.   }
  120.  
  121.  
  122.   // If topic is /b then update the blue output
  123.   if(topicStr == b_topic)
  124.   {
  125.     byte b = strToByte(payload, length);
  126.  
  127.     Serial.print("Blue level: ");
  128.     Serial.println(b);
  129.     analogWrite(PIN_B, b);
  130.   }
  131.  
  132.   // If topic is /a then update the white/aux output
  133.   if(topicStr == a_topic)
  134.   {
  135.     byte a = strToByte(payload, length);
  136.  
  137.     Serial.print("Aux level: ");
  138.     Serial.println(a);
  139.     analogWrite(PIN_A, a);
  140.   }
  141.  
  142. }
  143.  
  144.  
  145. // Functio to reconnect to the WiFi network if the connection is lost
  146. void reconnect()
  147. {
  148.   // Check if connection is lost
  149.   if(WiFi.status() != WL_CONNECTED)
  150.   {
  151.     Serial.print("Connecting to ");
  152.     Serial.println(ssid);
  153.  
  154.     // Wait for the connection to be established
  155.     while (WiFi.status() != WL_CONNECTED)
  156.     {
  157.       delay(500);
  158.       Serial.print(".");
  159.     }
  160.  
  161.     // Print out some connection info
  162.     Serial.println();
  163.     Serial.println("WiFi connected to: ");  
  164.     Serial.println(WiFi.localIP());
  165.   }
  166.  
  167.   // If the connection is established then attempt to connect tot he MQTT broker
  168.   if(WiFi.status() == WL_CONNECTED)
  169.   {
  170.  
  171.     // Keep looping until we connect tot he broker
  172.     while (!client.connected())
  173.     {
  174.       Serial.print("Connection tot he MQTT broker...");
  175.  
  176.       // Generate client name based on MAC address
  177.       String clientName;
  178.       clientName += "esp8266-";
  179.       uint8_t mac[6];
  180.       WiFi.macAddress(mac);
  181.       clientName += macToStr(mac);
  182.  
  183.       // If connected to the broket then subscribe to the /r, /g, /b, /a topics
  184.       if (client.connect((char*) clientName.c_str()))
  185.       {
  186.         Serial.print("MQTT Connected");
  187.  
  188.         client.subscribe(r_topic);
  189.         client.subscribe(g_topic);
  190.         client.subscribe(b_topic);
  191.         client.subscribe(a_topic);
  192.       }
  193.  
  194.       // If a connection couldn't be established the print out the abort message
  195.       else{Serial.println("\tFailed."); abort();}
  196.     }
  197.   }
  198. }
  199.  
  200.  
  201. // Get the MAC address
  202. String macToStr(const uint8_t* mac)
  203. {
  204.   String result;
  205.  
  206.   for (int i = 0; i < 6; ++i) {
  207.     result += String(mac[i], 16);
  208.  
  209.     if (i < 5){
  210.       result += ':';
  211.     }
  212.   }
  213.  
  214.   return result;
  215. }
  216.  
  217.  
  218. // Convert an 8 bit value from type char array to a byte value
  219. byte strToByte(byte *str, byte length)
  220. {
  221.   byte val = 0;
  222.   for(byte i = 0; i < length; i++)
  223.     if(str[i] >= '0' && str[i] <= '9')
  224.       val = (val * 10) + (str[i] - '0');
  225.  
  226.   return val;
  227. }
  228.  


Installing WLED firmware:

As of 30/08/23 the ESP-ARGB module is shipped with the WLED firmware already installed. However, if you need to reinstall the firmware you can follow these steps:

To install the WLED firmware first follow the ‘Programming the ESP-ARGB’ section above to connect the module to your computer via a USB to serial adaptor.

You will also need the ESPHome flashing tool which can be downloaded and installed from here:

https://github.com/esphome/esphome-flasher/releases

Finally, you will need the WLED firmware bin file. We recommend downloading the image we currently install in the ESPARGB modules here:

https://hobbycomponents.com/downloads/E ... DU0234.bin

Alternatively latest binaries can be downloaded from Github here:

https://github.com/Aircoookie/WLED/releases

Important: In the above link make sure you download the ESP8266 version of the firmware which will look something like this WLED_x.xx.x-xx_ESP8266.bin.


Once you have followed the above steps you can now flash the downloaded firmware to the device:

Open the ESPHome tool, select the serial port of your USB adaptor and in the firmware box browse to wherever you downloaded the bin file.

If you've not already, put the ESP-ARGB module into programming mode (see Programming the ESP-ARGB section above)

Click the ‘Program ESP’ button to flash the firmware to the module.

If the firmware uploaded ok click the reset button on the module to reset the device and boot the WLED firmware.

To setup the firmware follow our blog post here: [LINK TBA]


3D Printer Case:

Image

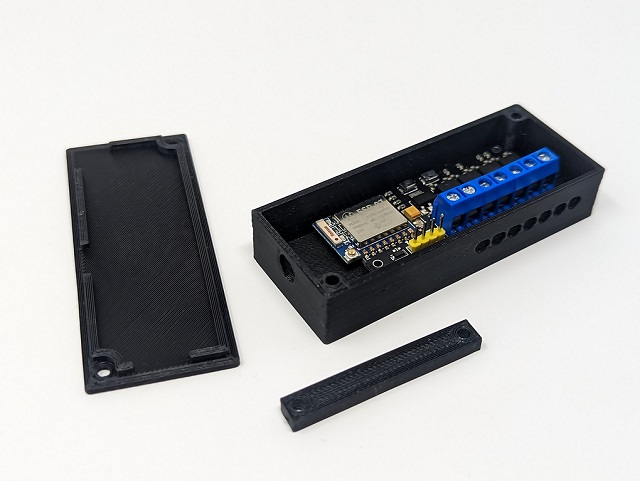
For customers with a 3D printer we have uploaded a custom case to thingyverse which can be printed out on a standard 3D printer. You can find the STL files here:

https://www.thingiverse.com/thing:5796700


Libraries, example code, and diagrams are provided as an additional free service by Hobby Components and are not sold as part of this product. We do no provide any guarantees or warranties as to their accuracy or fitness for purpose.

Descriptions and diagrams on this page are copyright Hobby Components Ltd and may not be reproduced without permission.

Sp33dy
Posts: 2
Joined: Mon Jul 08, 2024 9:33 am

Re: ESP-ARGB Controller With WLED firmware (HCMODU0234)

Post by Sp33dy » Mon Jul 08, 2024 9:43 am

WiFi issues...

Purchased two of these for use as simple light controllers in our lab area.

Noticed that when the units are in AP mode (WLED being the AP) they go intermittently unresponsive, they need a button push to wake them up, However when you use them connected to your local WiFi network they go completely unresponsive.

Running some pings to the unit resulted in one ping response in every 30 or so pings, tested these at home and got the same result.

In the end, I setup a fresh WLED install on a WEMOS 8266 mini d1 v3, and that is spot on, it hasn't missed a beat.

Is there a known WiFi issue with this module? or should I try to update the WLED firmware? If so then I need to buy a FTDI to USB unit to do so...

Thanks in advance.

andrew
Site Admin
Posts: 1416
Joined: Sun Aug 05, 2012 4:15 pm

Re: ESP-ARGB Controller With WLED firmware (HCMODU0234)

Post by andrew » Mon Jul 08, 2024 3:48 pm

Noticed that when the units are in AP mode (WLED being the AP) they go intermittently unresponsive, they need a button push to wake them up, However when you use them connected to your local WiFi network they go completely unresponsive.
Is there a known WiFi issue with this module?

Sorry to hear that you’re having problems. There are currently no issues that we are aware of. From what you describe it sounds like that they are randomly crashing for some reason. A couple of things you may want to check just to rule out an external issue...

Do they work better when in closer proximity to your phone/router?

If you limit the power to the LED strip, or even keep the strip turned off, do they stop locking up? Or at least get better?
Comments made by this poster do not necessarily reflect the views of Hobby Components Ltd.

Sp33dy
Posts: 2
Joined: Mon Jul 08, 2024 9:33 am

Re: ESP-ARGB Controller With WLED firmware (HCMODU0234)

Post by Sp33dy » Tue Jul 09, 2024 8:08 am

Hi Andrew, many thanks for the prompt response.
andrew wrote:
Mon Jul 08, 2024 3:48 pm

Sorry to hear that you’re having problems. There are currently no issues that we are aware of. From what you describe it sounds like that they are randomly crashing for some reason. A couple of things you may want to check just to rule out an external issue...

Do they work better when in closer proximity to your phone/router?
No this made no difference.
If you limit the power to the LED strip, or even keep the strip turned off, do they stop locking up? Or at least get better?
Tried with and without the LED strip connected, switched on and off. and even a different 5V PSU but still had no joy.

I'm going to flash these with a later code at some point, but for now it's not critical at all as i'm up and running on the ES8266 Wemos Mini's.

Many thanks again.

andrew
Site Admin
Posts: 1416
Joined: Sun Aug 05, 2012 4:15 pm

Re: ESP-ARGB Controller With WLED firmware (HCMODU0234)

Post by andrew » Tue Jul 09, 2024 1:42 pm

Tried with and without the LED strip connected, switched on and off. and even a different 5V PSU but still had no joy.
That’s a shame, although I certainly don’t want to rule out a problem with the modules themselves, I was expecting that to be the cause.

What with you powering it at 5V it may be worth checking the voltage though (assuming of course you have a voltmeter)

I'm going to flash these with a later code at some point…
I don’t expect it to be a firmware issue as it’s the same version that’s always been shipped in these modules but I guess if you're wanting to try a different version it wouldn't hurt. I can always email you the current version if you need to flash it back to the original.

If you still have no luck we can always send you a return box. I’d be happy to take a look myself.
Comments made by this poster do not necessarily reflect the views of Hobby Components Ltd.

Post Reply

Return to “Expressive (ESP8266)”