mLink NEC IR Transceiver (HCMODU0195)

mLink serial I2C modules
Post Reply
admin
Site Admin
Posts: 867
Joined: Sun Aug 05, 2012 4:02 pm

mLink NEC IR Transceiver (HCMODU0195)

Post by admin » Thu Oct 26, 2023 2:18 pm

Image


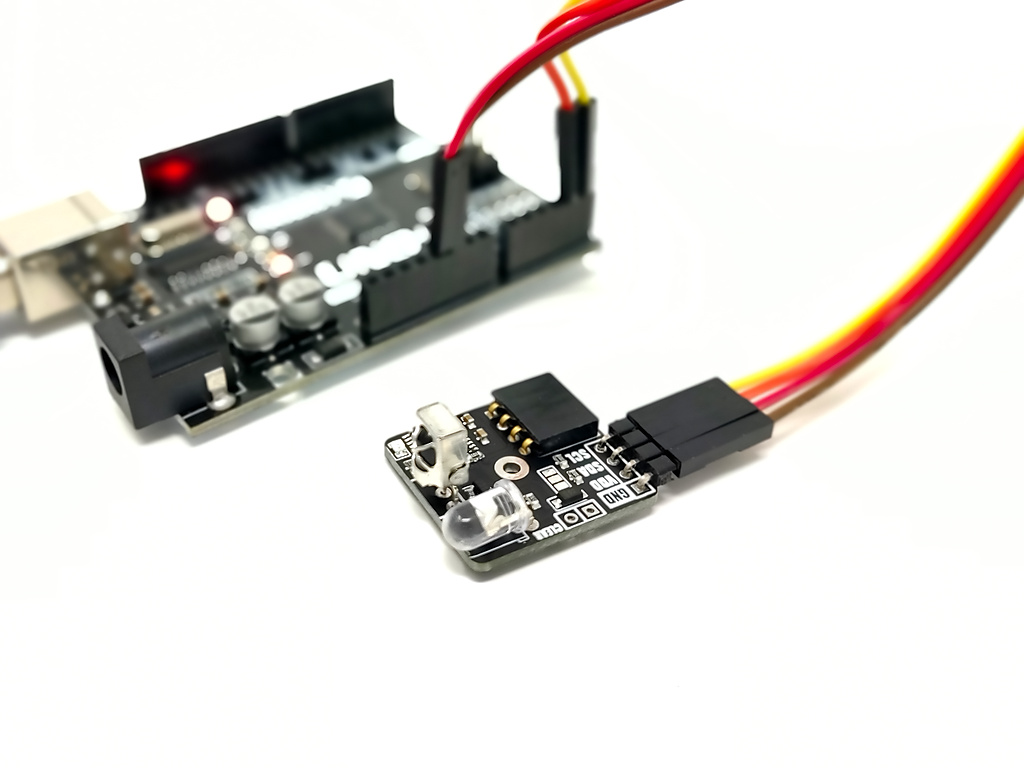
The mLink NEC IR Transceiver is a small serial I2C based module that is capable of sending and receiving infrared remote control signals compatible with the NEC protocol.

The NEC IR protocol is the prevalent standard for infrared remote communication, widely adopted by various IR-enabled devices like TVs, set-top boxes, air conditioners, and projectors. With this module, you can use your microcontroller to effortlessly capture and transmit signals to and from these compatible devices, making it an excellent choice for home automation projects.

Compatible with microcontrollers equipped with an I2C interface, including popular Arduino models, wireless ESP devices, and Raspberry Pi, this module offers versatile control options. As part of the mLink series, it seamlessly integrates with other mLink modules. This means you can easily daisy-chain multiple mLink modules, enabling centralised control through a single serial interface.

For Arduino users you can use the mLink library (see below for library and examples) to control any type of mLink module. Only one single instance of the library is needed to control multiple types of mLink modules resulting in very little resource overhead and therefore making it great for Arduinos with small amounts of memory and pin counts.

For Raspberry Pi users we have a Python module which can be installed via pip or downloaded and installed directly from our forum. Please see the mLink Python forum thread for requirements and download link here: viewtopic.php?f=131&t=3062&p=8592#p8592


Image


Image

Module code: 						HCMODU0195
Supply voltage (VDD): 				5V
Current consumption (idle):			6mA
I2C Interface speed:					400kbits/s (fast mode)
I2C default address (HEX):				0h5C
Maximum number of modules:			5 with pullups fitted, 112 with pullups removed*
IR modulation frequency:				38KHz 
IR reception angle:					~45 degrees
IR reception distance (max):			18m
IR transmission range (max):			8m
IR compatible protocol:				NEC infrared protocol
Module dimensions ex headers (LxWxH):	24.5mm x 23mm x 13mm


*Note the maximum number of connected modules will depend on cable lengths and power requirements of each module. Do not exceed 5 mLink modules connected in series with I2C pullups fitted to all modules. For disconnecting pullups see forum post.


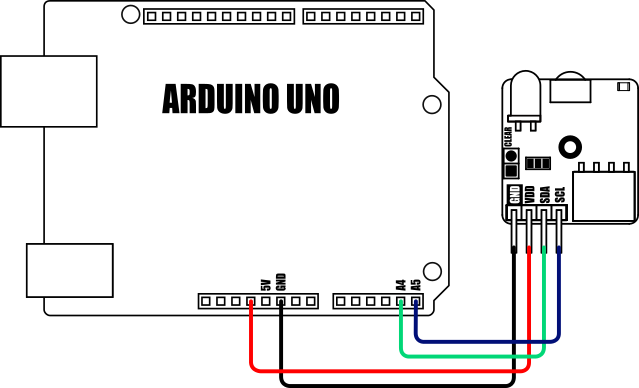
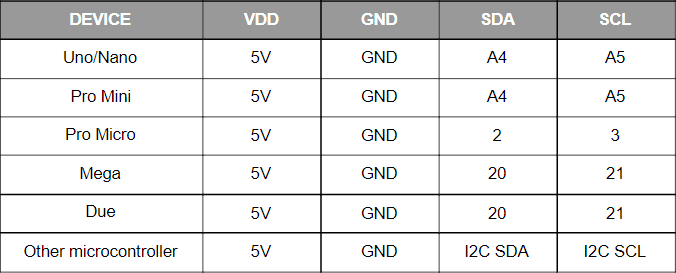
Arduino Connection Example:

Image


Image


NEC IR receive example

Read an NEC IR code from a remote control:
This sketch uses the mLink library to read the add and command
bytes from an NEC compatible IR remote control.

  1. #include "mLink.h"                          // Include the library
  2.  
  3. mLink mLink;                                // Create an instance of the library
  4.  
  5. #define I2C_ADD 0x5C                        // Default I2C address
  6.  
  7. void setup()
  8. {
  9.   Serial.begin(9600);
  10.  
  11.   mLink.init();                             // Initialise the library
  12. }
  13.  
  14.  
  15. void loop()
  16. {
  17.   // Check if a code has been received
  18.   byte count = mLink.IR_Count(I2C_ADD);
  19.  
  20.   if(count)
  21.   {
  22.     // Is it a valid NEC code?
  23.     if(mLink.IR_NEC_Valid(I2C_ADD))
  24.     {
  25.       // If so then get the codes address and command bytes
  26.       byte address = mLink.IR_Read_NEC_Add(I2C_ADD);
  27.       byte command = mLink.IR_Read_NEC_Command(I2C_ADD);
  28.  
  29.       Serial.print("Address = 0x"); Serial.println(address, HEX);
  30.       Serial.print("Command = 0x"); Serial.println(command, HEX);
  31.       Serial.print("Repeated = "); Serial.println(count - 1);
  32.       Serial.println();
  33.     }
  34.   }
  35.  
  36.   delay(100);                              // Wait a moment before reading again
  37. }

NEC IR transmit example

Transmit an NEC IR code to a device:
This sketch uses the mLink library to send an NEC compatible address and command code each time your Arduino is reset. To get an address and command byte to send just run the NEC IR receive example sketch first and press an appropriate button on your IR remote control.

  1. #include "mLink.h"                          // Include the library
  2.  
  3. mLink mLink;                                // Create an instance of the library
  4.  
  5. #define I2C_ADD 0x5C                        // Default I2C address
  6.  
  7. byte NEC_Add =      0x00;                   // The NEC address byte to send
  8. byte NEC_Command =  0x0A;                   // The NEC command byte to send
  9.  
  10.  
  11. void setup()
  12. {
  13.   Serial.begin(9600);
  14.  
  15.   mLink.init();                             // Initialise the library
  16.  
  17.   // Write the NEC address and command
  18.   mLink.IR_Write_NEC(I2C_ADD, NEC_Add, NEC_Command);
  19.  
  20.   // Send it one time
  21.   mLink.IR_Send(I2C_ADD, 1);
  22. }
  23.  
  24.  
  25. void loop()
  26. {
  27.   // Nothing to do here
  28. }

IR data receive example

IR data receive example:
This sketch uses the mLink library to read all 4 bytes of a received NEC IR transmission. If you have 2 mLink NEC IR modules you can use this sketch in conjunction with the IR data transmit example sketch to send data from one Arduino to another.

  1. #include "mLink.h"                          // Include the library
  2.  
  3. mLink mLink;                                // Create an instance of the library
  4.  
  5. #define I2C_ADD 0x5C                        // Default I2C address
  6.  
  7. byte data[4];                               // Array to store the received data.
  8.  
  9. void setup()
  10. {
  11.   Serial.begin(9600);
  12.  
  13.   mLink.init();                             // Initialise the library
  14. }
  15.  
  16.  
  17. void loop()
  18. {
  19.   byte count = mLink.IR_Count(I2C_ADD);     // Check if new data has been received
  20.  
  21.   if(count)
  22.   {
  23.       mLink.IR_Read(I2C_ADD, data);         // Get the data
  24.  
  25.       Serial.print(data[0], HEX);
  26.       Serial.print(" : ");
  27.       Serial.print(data[1], HEX);
  28.       Serial.print(" : ");
  29.       Serial.print(data[2], HEX);
  30.       Serial.print(" : ");
  31.       Serial.println(data[3], HEX);
  32.   }
  33.  
  34.   delay(100);                              // Wait a little before reading again
  35. }

IR data transmit example

IR data transmit example:
This sketch uses the mLink library to send 4 bytes of data in a single NEC IR transmission.

If you have 2 mLink NEC IR modules you can use this sketch in conjunction with the IR data receive example sketch to send data from one Arduino to another.

  1. #include "mLink.h"                          // Include the library
  2.  
  3. mLink mLink;                                // Create an instance of the library
  4.  
  5. #define I2C_ADD 0x5C                        // Default I2C address
  6.  
  7. void setup()
  8. {
  9.   Serial.begin(9600);
  10.  
  11.   mLink.init();                             // Initialise the library
  12.  
  13.   byte data[] = {0x00, 0x01, 0x02, 0x03};   // Array containing the 4 bytes of data to send.
  14.  
  15.   mLink.IR_Write_Data(I2C_ADD, data);       // Write the data to the module
  16. }
  17.  
  18.  
  19.  
  20. void loop()
  21. {
  22.   mLink.IR_Send(I2C_ADD, 1);                // Send the data
  23.  
  24.   delay(1000);                              // Wait a second before sending again
  25. }


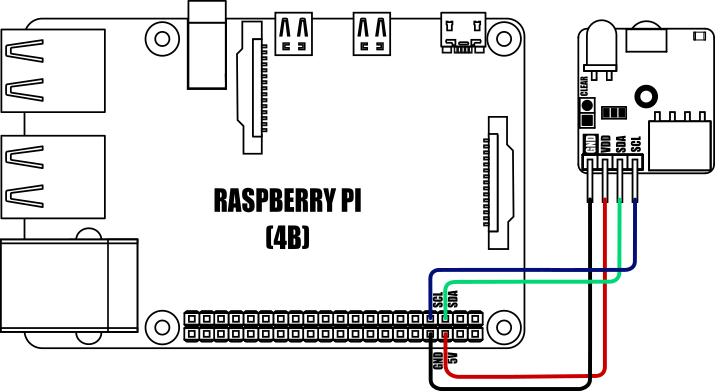
Raspberry Pi Connection Example:

Image

NEC IR receive example

Read an NEC IR code from a remote control:
This script uses the mLink python module to read the add and command bytes from an NEC compatible IR remote control.
  1. from mLink import mLink                         # Import the mLink module
  2. import time
  3.  
  4. ml = mLink.mLink(1)                             # Create an instance of the module
  5.  
  6. I2C_ADD = 0x5c                                  # Default I2C address is 0x5c
  7.  
  8.  
  9. while 1:
  10.     if ml.IR_Count(I2C_ADD):                    # Is there a new code ?
  11.         add = ml.IR_Read_NEC_Address(I2C_ADD)   # If so then get the address byte
  12.         com = ml.IR_Read_NEC_Command(I2C_ADD)   # and the command byte
  13.        
  14.         print("Address:", hex(add), "Command:", hex(com), sep=" ")
  15.        
  16.     time.sleep(1)                               # Wait a little before checking again

NEC IR transmit example

Transmit an NEC IR code to a device:
This script uses the mLink python module to send an NEC compatible address and command code each time your Arduino is reset. To get an address and command byte to send just run the NEC IR receive example sketch first and press an appropriate button on your IR remote control.
  1. from mLink import mLink                     # Import the mLink module
  2. import time
  3.  
  4. ml = mLink.mLink(1)                         # Create an instance of the module
  5.  
  6. I2C_ADD = 0x5c                              # Default I2C address is 0x5c
  7.  
  8. NEC_ADD = 0x00                              # NEC IR address byte to send
  9. NEC_COM = 0x0A                              # NEC IR command byte to send
  10.  
  11. ml.IR_Write_NEC(I2C_ADD, NEC_ADD, NEC_COM)  # Load the address and command into the Tx buffer
  12.  
  13.  
  14. while 1:
  15.     ml.IR_Send(I2C_ADD, 1)                  # Send it once every 2 seconds
  16.     time.sleep(2);

IR data receive example

IR data receive example:
This script uses the mLink python module to read all 4 bytes of a received NEC IR transmission. If you have 2 mLink NEC IR modules you can use this sketch in conjunction with the IR data transmit example sketch to send data from one Arduino to another.
  1. from mLink import mLink                         # Import the mLink module
  2. import time
  3.  
  4. ml = mLink.mLink(1)                             # Create an instance of the module
  5.  
  6. I2C_ADD = 0x5c                                  # Default I2C address is 0x5c
  7.  
  8.  
  9.  
  10. while 1:
  11.     if ml.IR_Count(I2C_ADD):                    # Is there a new code ?
  12.         data = ml.IR_Read(I2C_ADD)              # If so then get the data
  13.         print(data)                             # and print it out
  14.        
  15.         time.sleep(1)                           # Wait a little before checking again

IR data transmit example

IR data transmit example:
This script uses the mLink python module to send 4 bytes of data in a single NEC IR transmission.

If you have 2 mLink NEC IR modules you can use this sketch in conjunction with the IR data receive example sketch to send data from one Arduino to another
.
  1. from mLink import mLink                         # Import the mLink module
  2. import time
  3.  
  4. ml = mLink.mLink(1)                             # Create an instance of the module
  5.  
  6. I2C_ADD = 0x5c                                  # Default I2C address is 0x5c
  7.  
  8.  
  9. data = [0x00, 0xFF, 0x0A, 0xF5]                 # Some example data to send
  10.                                                 # Note: we can only send 4 bytes at a time
  11.  
  12. ml.IR_Write_Data(I2C_ADD, data)                 # Load the address and command into the Tx buffer
  13.  
  14. while 1:
  15.     ml.IR_Send(I2C_ADD, 1)                      # Send it once every 2 seconds
  16.     time.sleep(2)


Other useful information:


Factory Reset:

Should you wish to restore the module back to its factory default configuration, this can be done by manually forcing a factory reset. All mLink modules include a set of pads labelled clear:

Image

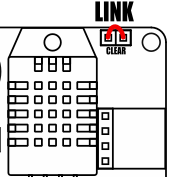
To perform a factory reset carefully link the two pads together with a piece of wire or with something conductive such as a paperclip. Whilst linked, connect power to the module via the VCC and GND connections. Wait a few seconds and then remove the short from the pads. The module's settings, including its I2C address, should now be restored back to factory defaults.


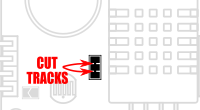
Removing I2C pullups:

If your development board already has pullups for its I2C interface fitted, or you wish to connect more than 5 mLink boards to the same I2C interface, then you can remove the pullups for the additional boards by cutting the tracks between the solder pads shown below.

Image


Image

mLink Arduino library

viewtopic.php?f=58&t=3001

Please note you will need at least V1.7.1 (20 Oct 2023) of the library to support this module. If you have an older version already installed please update it to the latest version.


mLink Raspberry Pi Python module
The mLink python module can be installed with the following terminal command:

  1. pip install hc-mlink

Alternatively the library can be manually installed by downloading it from the forum and unzipping it to your project folder. See the Python module forum thread for more information and download link:
viewtopic.php?f=131&t=3062&p=8592#p8592

Please note that in some cases there may be additional configuration required. If you have issues getting your Raspberry Pi to communicate with the mLink module then please see the Python module forum thread here: viewtopic.php?f=131&t=3062


mLink Specifications and Register Map
https://hobbycomponents.com/downloads/m ... er_Map.pdf


Libraries, example code, and diagrams are provided as an additional free service by Hobby Components and are not sold as part of this product. We do not provide any guarantees or warranties as to their accuracy or fitness for purpose.

Post Reply

Return to “mLink”