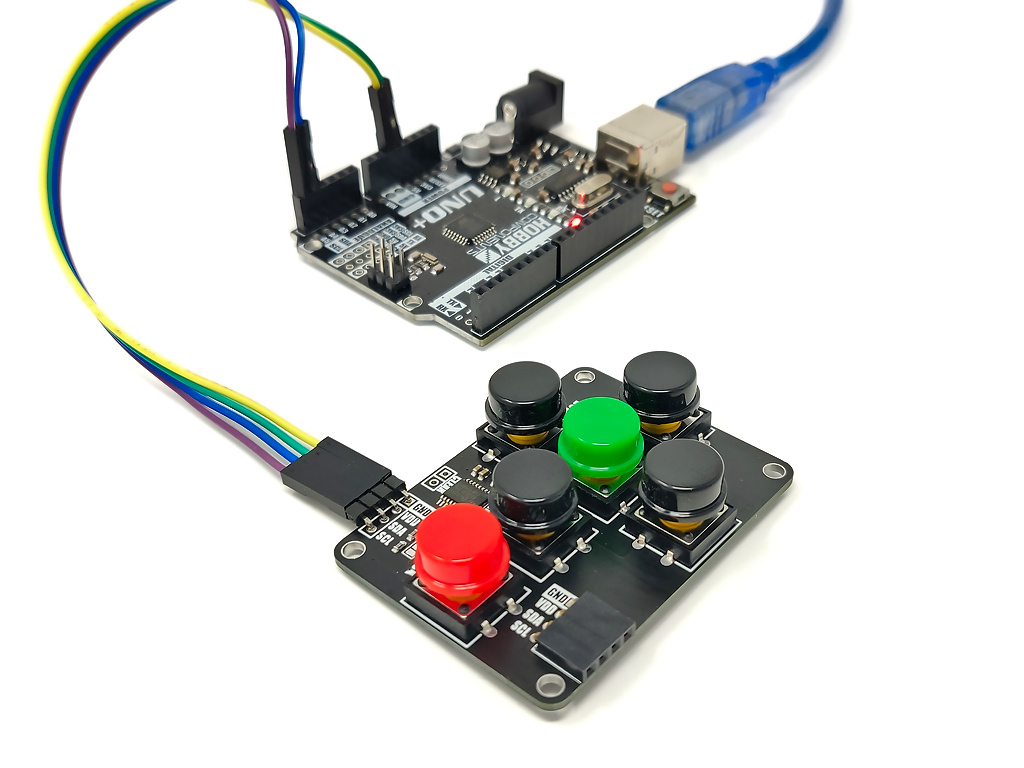

The mLink button pad is a 6 button keypad with a serial (I2C) interface. The buttons are arranged in a d-pad format (up, down, left, right, plus select and back buttons). They have a tactile feedback when pressed and come with large (11mm) coloured circular keycaps that also make the module ideal for panel mounting. The module can also store up to 16 key presses in its internal buffer meaning that your software does not have to constantly scan the keypad to capture keypresses.
Because it uses a standard I2C interface it is compatible with most microcontrollers including Arduino. It is addressable allowing for multiple modules to be connected together (address can be changed in software), and only requires 2 data pins for communication.
Being an mLink module it is compatible with other mLink or standard I2C modules allowing you to daisy-chain several different types of modules together using only the two I2C pins of your microcontroller.
For Arduino users you can use the mLink library (see below) to control any type of mLink module. The library has a very small memory footprint and only one single instance is needed to control multiple types of mLink modules. This makes it great for Arduinos with small amounts of memory and pin counts.
For Raspberry Pi users we have a Python module which can be installed via pip or downloaded and installed directly from our forum. Please see the mLink Python forum thread for requirements and download link here: viewtopic.php?f=131&t=3062&p=8592#p8592
Module specifications:
Module code: 					HCMODU0193
Supply voltage (VDD): 			3.3V to 5.5V
Operating range (recommended):	-5 to 105oC
Keypad type:					6 button tactile keypad in dpad + back arrangement
Current consumption (idle):		4.5mA
Interfaces:					I2C, Keypad
I2C Interface speed: 				400kbits/s (fast mode)
I2C default address (HEX): 		0h59
Maximum number of modules: 		5 with pullups fitted, 112 with pullups removed*
Module dimensions (inc headers):	59mm x 44mm x 16mm
*Note the maximum number of connected modules will depend on cable lengths and power requirements of each module. Do not exceed 5 mLink modules connected in series with all pullups fitted.
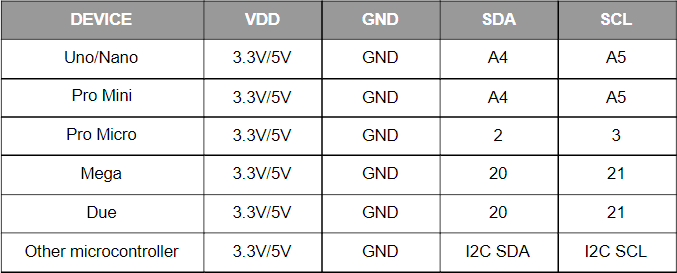
Arduino Connection Example:
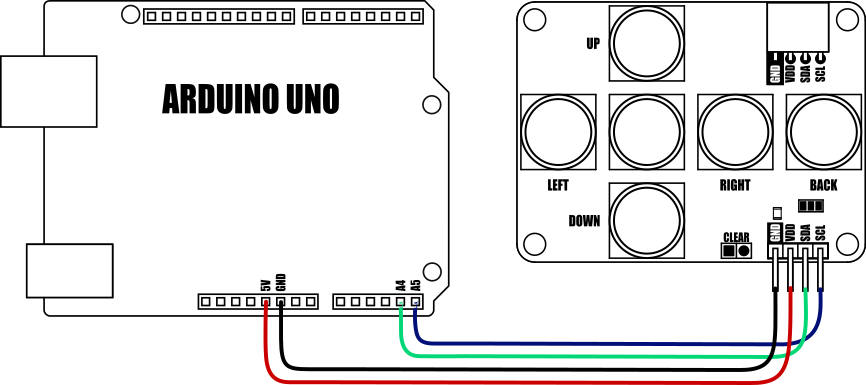
Because the modules use an I2C interface this also means multiple modules can be controlled from a single Arduino I2C interface simply by daisy-chaining them together. Note to control multiple mLink modules of the same type requires changing the default I2C address of the additional modules. See mLink Library Quick Start Guide for how to do this.

Arduino example:
- #include "mLink.h" // Include the library
- mLink mLink; // Create an instance of the library
- #define I2C_ADD BPAD_I2C_ADD // Default I2C address
- void setup()
- {
- Serial.begin(9600);
- mLink.init(); // Initialise the library
- }
- void loop()
- {
- byte empty = mLink.bPad_Empty(I2C_ADD); // Check to see if there is anything in the keypad buffer
- if(!empty)
- {
- byte key = mLink.read(I2C_ADD, BPAD_BUFFER); // If so then read a key from the buffer..
- Serial.print("Key: "); // ..and print it
- Serial.println(key);
- }
- delay(100);
- }
Arduino Connection Example:
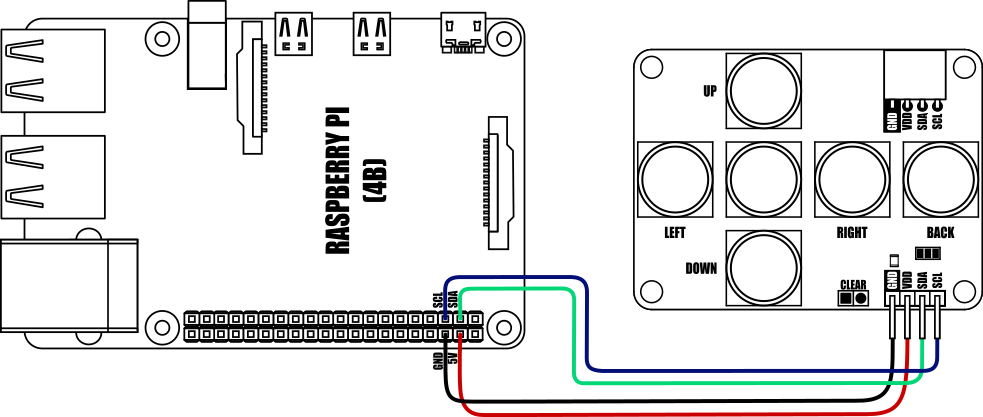
Raspberry Pi Python Example:
This program requires the mLink Python library module to be installed. Please see the following forum thread for more information on how to install the Python module and requirements:
viewtopic.php?f=131&t=3062
- from mLink import mLink # Import the mLink module
- import time
- ml = mLink.mLink(1) # Create an instance of the module
- I2C_ADD = 0x59 # Default I2C address is 0x59
- while 1:
- if ml.bPad_New_Key(I2C_ADD): # Check if a key has been pressed
- print(ml.bPad_Read_Key(I2C_ADD)) # If so print its name
- time.sleep(0.1)

mLink Arduino library
viewtopic.php?f=58&t=3001
mLink Raspberry Pi Python module
The mLink python module can be installed with the following terminal command:
- pip install hc-mlink
Alternatively the library can be manually installed by downloading it from the forum and unzipping it to your project folder. See the Python module forum thread for more information and download link:
viewtopic.php?f=131&t=3062&p=8592#p8592
Please note that in some cases there may be additional configuration required. If you have issues getting your Raspberry Pi to communicate with the mLink module then please see the Python module forum thread here: viewtopic.php?f=131&t=3062
mLink Library Quick Start Guide For Arduino Users
https://hobbycomponents.com/downloads/m ... _Guide.pdf
mLink Library Reference Guide For The Character LCD Sensor Modules
https://hobbycomponents.com/downloads/m ... _Guide.pdf
mLink Specifications and Register Map For The Character LCD Modules
https://hobbycomponents.com/downloads/m ... er_Map.pdf
Libraries, example code, and diagrams are provided as an additional free service by Hobby Components and are not sold as part of this product. We do no provide any guarantees or warranties as to their accuracy or fitness for purpose.
Descriptions and diagrams on this page are copyright Hobby Components Ltd and may not be reproduced without permission.