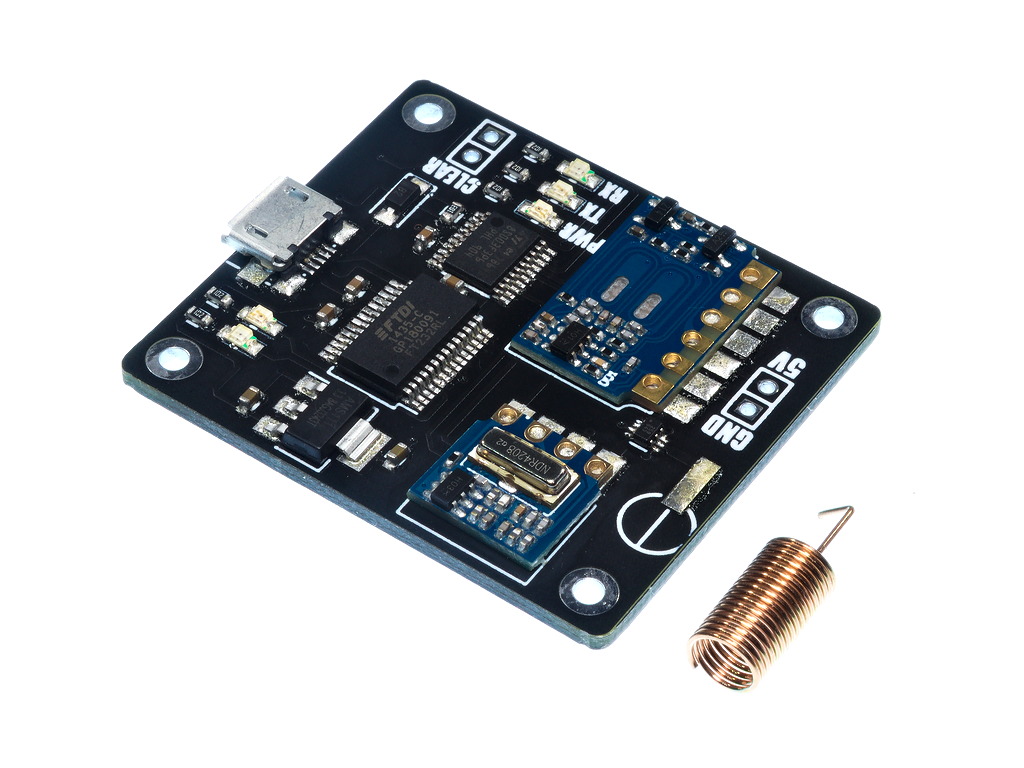
SmartRFy USB Module (HCMODU0144)
The SmartRFy USB module adds the ability to monitor and control a SmartRFy network directly from a computer. Connection to the computer is simply a case of connecting the module to the computers USB port via a micro USB cable (not supplied). Once connected the USB module will appear as a standard serial communication port which can then be used to send and receive text based SmartRFy commands to any remote SmartRFy module. By appearing as a standard serial port many types of third party software can be used with the USB module - from serial terminal programs to dedicated automation software such as Node-RED. This opens up the potential for far more advanced control and automation of SmartRFy modules.
The SmartRFy USB module also has the additional feature of being able to directly control Mercury branded energy saving mains socket adapters (see Hobby Components SKU: HCPOWE0010). These are remotely controlled adapters that sit between your electrical appliance and the mains socket and allow mains power to the appliance to be remotely controlled. Using the SmartRFy USB module you can individually control up to a total of 192 Mercury sockets.
Available from our online store here: https://hobbycomponents.com/smartrfy/10 ... usb-module
Features
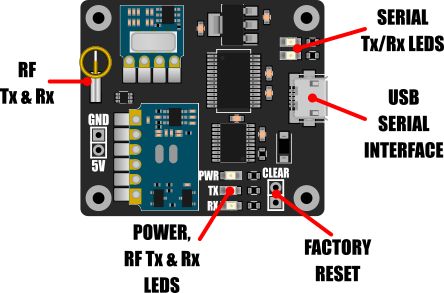
• Standard microUSB interface
• Add computer control of a SmartRFy network
• Appears as a standard virtual com port (VCP) serial interface
• Compatible with common operating systems (Windows, OSX, Linux, etc.)
• Can be used with most software supporting communication via serial interface including serial terminal software, Node-RED, etc.
• Compatible with Mercury branded energy saving sockets
• Powered directly from the computer USB interface
• Control monitor and control SmartRFy devices using simple text based commands
• Wireless serial communication with 8 different baud rates (9600 default).
Specification
Product code: HCMODU0144
Supply voltage: 4.5 to 5.5V
Supply current min: 19mA (idle)
Supply current max: 30.5mA (transmit)
Operating frequency: 433MHz (OOK)
Operating range: 30 meters (unobstructed)
Interfaces: RF Tx & Rx, and USB serial
Module dimensions (WxDxH): 41.3mm x 36.6mm x 4.7mm
SmartRFy system overview
SmartRFy modules are a range of wireless modules that provide a simple low cost way of controlling and monitoring remote devices and sensors. They are designed to work at their basic level with no programming required. However, when reconfigured or controlled via their serial interface they can also provide more complex and even autonomous functions.
SmartRFy modules work by wirelessly communicating with one another using simple text based commands - for example, to turn on a remote relay a command such as RLY=1 can be sent, and to turn it back off RLY=0. These commands can be automatically sent from one module to another or can be sent by a user via a modules serial interface to manually control modules on the SmartRFy network.
They are addressable and can grouped into one of 255 zones, with each zone capable of individually addressing 255 devices, giving a total of over 65,000 unique addresses. SmartRFy modules are designed to be both easy and flexible to use by providing three levels of control:
Zero configuration (out-of-the-box)
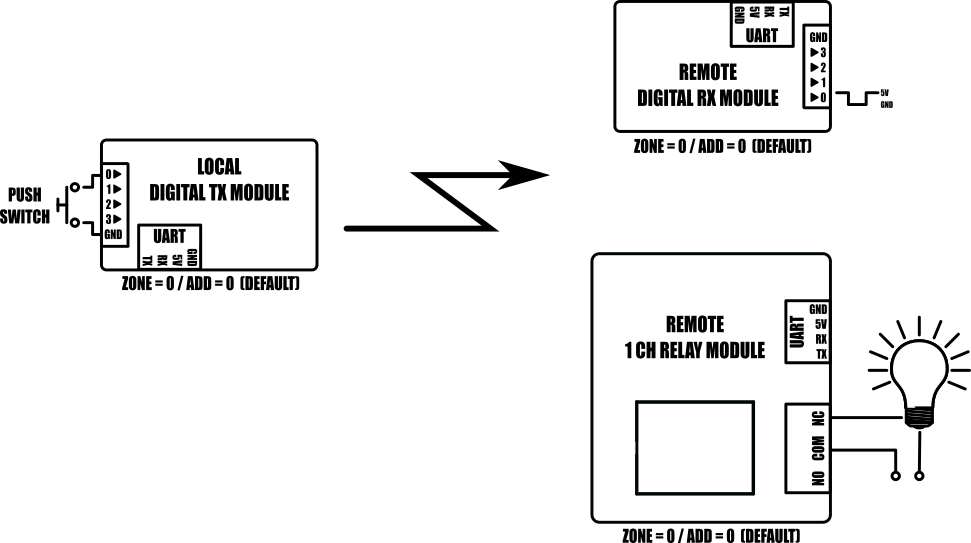
With no configuration at all the SmartRFy range of modules allow basic functionality such as remotely switching relays, digital pins, or monitoring sensors, such as temperature, humidity, light, motion etc. All SmartRFy modules default to the same zone and address and so can respond to, or control, other modules without the need to modify any zone or address settings.
Serial port configuration
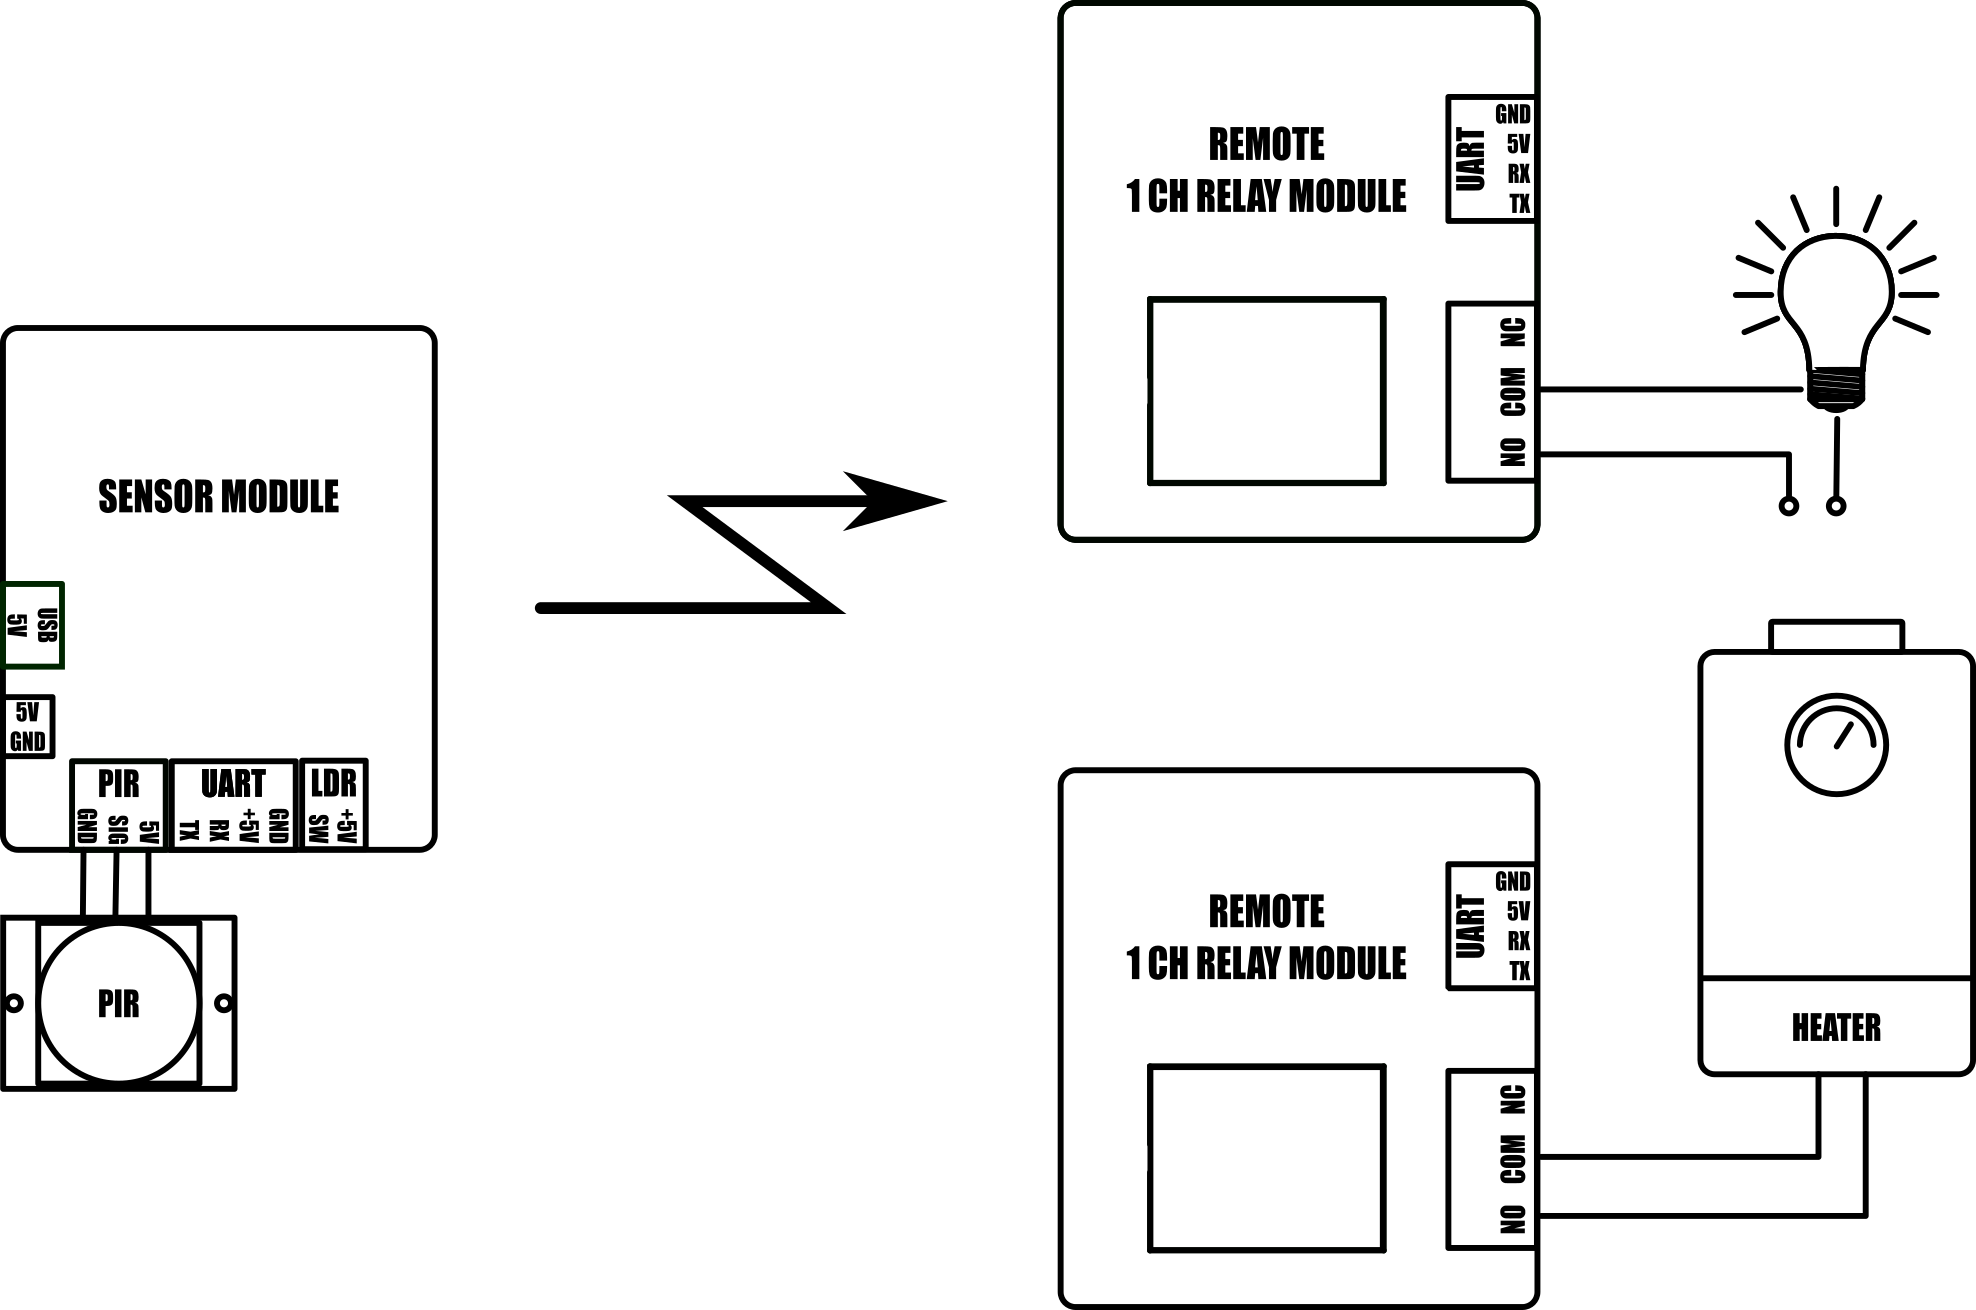
All SmartRFy modules include a serial port which allows them to be re-configured using simple text based commands. These text commands allow changing of configuration settings and control of specific features of each module. Any setting changes are stored by the modules non-volatile memory and so are retained even when power is removed from the module. When reconfigured they are able to perform more complex functions and even some basic autonomous tasks. For example, a SmartRFy relay module can be reconfigured to control a heating system based on the temperature transmitted from a remote sensor or, turn on a flood light for a set amount of time when triggered by a remote PIR – all without any additional hardware. Serial port configuration also allows a modules zone and address (all SmartRFy modules default to zone and address 0) to be changed. This provides the option for modules to be placed into groups, which will then only respond to other modules with a matching zone or address.
Slave controlled
Example 1: Turning on a remote relay with zone = 1 and address = 5
Example 2: Send plain serial text “Hello” to a remote microcontroller
SmartRFy modules can also be controlled via their serial port by other devices such as microcontrollers or computer based automation software such as Node-RED. Using a SmartRFy module as a slave device (must be capable of transmitting/receiving) gives a master device the ability to monitor and control any other SmartRFy devices on the network, regardless of their zone and address. SmartRFy modules can even be used as a passive wireless serial port for passing non-SmartRFy data to other remotely connected devices.
SmartRFy USB Module Manual
https://hobbycomponents.com/downloads/s ... Manual.pdf
Libraries, example code, and diagrams are provided as an additional free service by Hobby Components and are not sold as part of this product. We do no provide any guarantees or warranties as to their accuracy or fitness for purpose.
Descriptions and diagrams on this page are copyright Hobby Components Ltd and may not be reproduced without permission.
-
- Posts: 12
- Joined: Fri Feb 28, 2014 10:21 pm
Re: SmartRFy USB Module (HCMODU0144)
Hi,
Nice modules. Out of the two usb modules I could only get one to answer commands, you could see the led respond, but nothing on the screen. I thought I had reset the boards, until I read the link has to be in place before power..
Now they all respond ok. These remind me of some modules made by byvac some years ago. To be fair, you don't need a fast baud rate just to read a sensor or trip a relay and the radio modules look good quality. I suppose they would perform better with a 433MHz quarter wave, rather than a coil, something else to experiment with.
regards john
Re: SmartRFy USB Module (HCMODU0144)
Thanks for the feedback. We may at some point switch to a coiled wire instead of the spring antenna. This would give the option of being able to straighten it improve efficiency.
I have actually done some tests on the modules with just a straight 1/4 wave piece of wire and as expected it does seem to improve range slightly but I think it would help most in cases where a module is in a bit of a dead zone.
Comments made by this poster do not necessarily reflect the views of Hobby Components Ltd.
-
- Posts: 12
- Joined: Fri Feb 28, 2014 10:21 pm
Re: SmartRFy USB Module (HCMODU0144)
Hi,
The only other problem antenna wise, I suppose the more signal may swamp the receiver. I was thinking of something like an HB9CV or even a small yagi. All of this depends on the distance needed. They really are nicely made modules, and I hope a few more become available. I noticed, (and bought) some of the lcd drivers. It would be good to see one that supports the DS18B20 and the like temperature sensors and maybe some of the gas sensors.
regards john
Re: SmartRFy USB Module (HCMODU0144)
The receivers do have an AGC and the protocol (which is compatible with our Arduino HCWireless library btw) does send a preamble to give it time to adjust, but to what level it can handle I'm not sure.The only other problem antenna wise, I suppose the more signal may swamp the receiver.
Yep we've lots of ideas for new SmartRFy modules, and modules with just basic sensors are some of them. We've got a few more SmartRFy modules already in development it's just that with the current Covid situation over the past few months, we've been receiving so many orders that development of new products has had to take a bit of a back seat.It would be good to see one that supports the DS18B20 and the like temperature sensors and maybe some of the gas sensors.
Comments made by this poster do not necessarily reflect the views of Hobby Components Ltd.
-
- Posts: 6
- Joined: Tue Feb 02, 2021 11:24 pm
Re: SmartRFy USB Module (HCMODU0144)
I have started using the USB module today.
I am using a Raspberry Pi with Putty, minicom and picocom.
Whenever I type a * to start a command and before I can enter anything else the module responds with ERROR.
I have reset the module.
What am I doing wrong?
I am using a Raspberry Pi with Putty, minicom and picocom.
Whenever I type a * to start a command and before I can enter anything else the module responds with ERROR.
I have reset the module.
What am I doing wrong?
Re: SmartRFy USB Module (HCMODU0144)
By default it has a 2 second timeout on any command sent to the serial port. Try pasting your command into the terminal in one go to see if it works. Also don't forget to terminate the command with a cartridge return and line feed (CR+LF).Whenever I type a * to start a command and before I can enter anything else the module responds with ERROR.
You can disable or increase the default timeout time using the *STO command but of course you first need to be able to send a complete command within 2 seconds to do that..
Comments made by this poster do not necessarily reflect the views of Hobby Components Ltd.
-
- Posts: 6
- Joined: Tue Feb 02, 2021 11:24 pm
Re: SmartRFy USB Module (HCMODU0144)
Thanks for that info. I have followed your idea and pasted in a couple of codes. Minicom has the send LF and CR commands turned on. The module consistently replies ERROR to each code I enter.
As a beginner with this module I am probably doing something wrong, it is clearly not receiving anything it likes.
I have re read the manual but there are no clues there.
As a beginner with this module I am probably doing something wrong, it is clearly not receiving anything it likes.
I have re read the manual but there are no clues there.
Re: SmartRFy USB Module (HCMODU0144)
My knowledge of minicom is a bit limited I'm afraid but assuming you are sending the command in the correct format, e.g. to get the address of the module the command would be...
*ADD?
...then it is very likely the error is being caused by the CR+LF not being appended to the end of the command. This maybe a bit tricky to do in 2 seconds but try pasting the above command into minicom then quickly typing CTRL+M then CTRL+J which should manually append the CR and LF after the command. You'll have to do that within the default 2 seconds but if it works then it should return a '0' for the address. If it does work then that will at least confirm that's the issue.
Comments made by this poster do not necessarily reflect the views of Hobby Components Ltd.
-
- Posts: 6
- Joined: Tue Feb 02, 2021 11:24 pm
Re: SmartRFy USB Module (HCMODU0144)
It works!
Thanks for your assistance Andrew.
I read up a little more on minicom (which a GNU/Linux version of the DOS Telix program). I discovered how to send a plain ASCII file. So I wrote a file on the command line to make sure it was clean and embedded the CR+LF control codes.
I sent the file and received the response ‘0’. I have also sent a get firmware version request and that also worked.
Now the module and I are on speaking terms.
Thanks again.