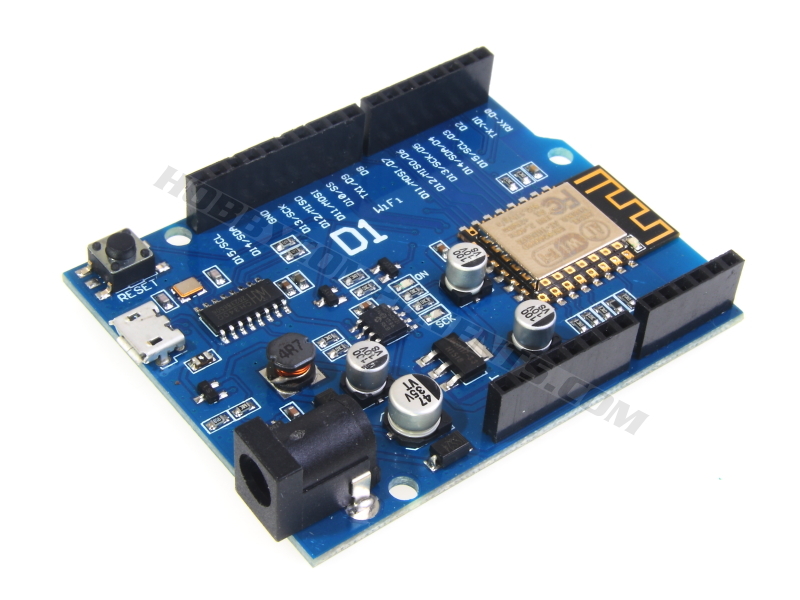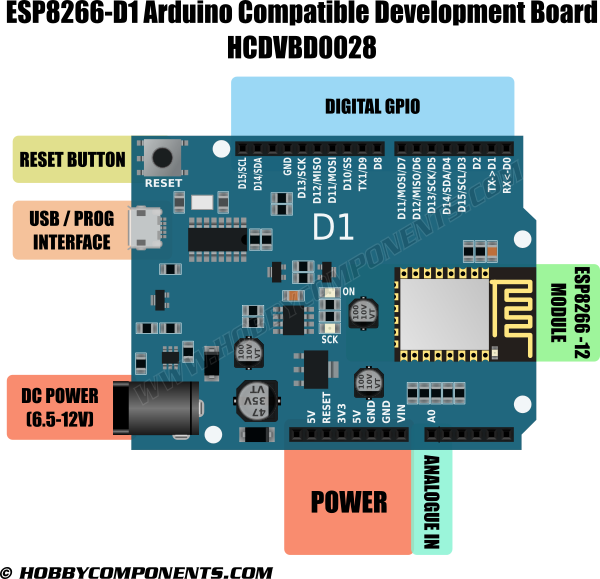

The ESP8266-D1 is a wireless 802.11 (Wifi) microcontroller development board compatible with the Arduino IDE. It turns the very popular ESP8266 wireless (WiFi) module into a fully fledged development board. The layout of this board is based on a standard Arduino hardware design with similar proportions to the Arduino Uno and Leonardo. It also includes a set of standard Arduino headers which means many existing Arduino shields can be plugged directly into the board (see note below).
The development board also includes a CH340 USB to serial interface giving it the ability to be connected and programmed directly from your computer and requiring only a common micro USB cable – no additional interface hardware or configuring is required. Once connected to the computer, and drivers have been installed, the ESP8266-D1 will appear as a standard serial COM port. The ESP8266-D1 can be programmed directly from the Arduino Integrated Development Environment (IDE) which is freely available for download from the Arduino website (arduino.cc).
Direct Arduino IDE support for this development board can be added with just a few mouse clicks via the built-in board manager feature. Programming the ESP8266-D1 via the IDE is then as straight-forward as programming any standard Arduino development board. Many of the default Arduino commands will work including digital and analogue pin functions and many examples are included in the IDE which demonstrate how to take advantage of the ESP8266s WiFi capabilities. These examples range from simply blinking an LED to turning the ESP8266-D1 into a stand-alone web server.
To quickly get going we have provided an Arduino setup guide on our blog site here:
http://blog.hobbycomponents.com/?p=594
Please note: This board requires a USB driver to be installed. Currently supported operating systems include all 32 & 64 bit versions of Windows 7,8, & 10. Drivers can be found at the bottom of this post.
This a 3.3V development board and is not compatible with 5V hardware. Please check comparability before purchasing Arduino shields.

Features:
ESP8266-D1 Development Board:
• Product code: HCDVBD0028
• Integrated ESP8266 module with 32-bit 80MHz microcontroller/4M flash
• microUSB serial/programming interface
• Can be powered via USB cable – no external PSU required
• Arduino Compatible headers
• Directly supported by the Aduino IDE
• 2.1mm external DC PSU socket (6.5 - 12V)
ESP8266 Module:
• 802.11 b/g/n
• Integrated low power 32-bit MCU
• Integrated 10-bit ADC
• Integrated TCP/IP protocol stack
• Integrated TR switch, balun, LNA, power amplifier and matching network
• Integrated PLL, regulators, and power management units
• Supports antenna diversity
• WiFi 2.4 GHz, support WPA/WPA2
• Support STA/AP/STA+AP operation modes
• Support Smart Link Function for both Android and iOS devices
• SDIO 2.0, (H) SPI, UART, I2C, I2S, IR Remote Control, PWM, GPIO
• STBC, 1x1 MIMO, 2x1 MIMO
• A-MPDU & A-MSDU aggregation & 0.4s guard interval
• Deep sleep power <10uA, Power down leakage current < 5uA
• Wake up and transmit packets in < 2ms
• Standby power consumption of < 1.0mW (DTIM3)
• +20 dBm output power in 802.11b mode
• Operating temperature range -40C ~ 125C
• FCC, CE, TELEC, WiFi Alliance, and SRRC certified
Example Arduino Blink Sketch:
Code: Select all
/* HCDVBD0027 Blink example - HobbyComponents.com */

#include <ESP8266WiFi.h>

#define PIN 2               // Flash the LED connected to GPIO2

void setup()
{
  pinMode(PIN, OUTPUT);     // Set the pin to an output
}


void loop()
{
  digitalWrite(PIN, LOW);   // Turn the LED on
  delay(1000);              // Wait for a second
  digitalWrite(PIN, HIGH);  // Turn the LED off
  delay(1000);              // Wait for another second
}
USB 32/64 bit drivers for Microsoft windows computer can be downloaded from our Github page here:
https://github.com/HobbyComponents/CH340-Drivers
or from our website Windows Drivers can be downloaded here
Windows Installation Instructions
Drivers are available at the bottom of this page. Simply download and unzip them, plug in your ESP8266-D1 and when the new hardware is detected, point the wizard to the folder you just unzipped to and it should install without any problems.
MAC installation instructions
New code signed version confirmed to work with El Capitan
Instructions:
Download the driver (you must be logged in to download.
Once downloaded, double-click the zip file to unzip it.
Run installer found in that folder.
If asked to restart, do not restart just yet.
Now restart your Mac.
Disclaimer: Libraries, example code, and diagrams are provided as an additional free service by Hobby Components and are not sold as part of this product. We do no provide any guarantees or warranties as to their accuracy or fitness for purpose.
Descriptions and diagrams on this page are copyright Hobby Components Ltd and may not be reproduced without permission.