

Our hugely popular low cost 8 channel analyser (HCTEST0006) is designed to work with the sigrok Open-Source signal analysis software suite giving this analyser a feature list normally found on analysers costing significantly more. When used with the sigrok PulseView software you can capture and decode up to 8 digital channels at a maximum sample rate of 24MHz*. The software includes built in decoders for many types of protocols including CAN, I2C, JTAG, SPI, UART and so on.
Please note that we only support use of this item with sigrok PulseView & CLI software. Compatible with Windows XP/Vista/7/8/10 32 & 64 bit.
For more information about Sigrok software please visit the Sigrok wiki site:
http://sigrok.org/wiki/Main_Page
PulseView Manual
https://sigrok.org/doc/pulseview/0.4.1/manual.html

8 Channel input
24MHz sampling rate
Led power indicator
Led logic level indicator for channel 0
Powered by USB
Sampling depth: 1T
Sampling rates can be set as follows:
24MHz*, 16MHz*, 12MHz*, 8MHz*, 6MHz*, 4MHz*, 2MHz, 1MHz, 500KHz, 250KHz, 200KHz, 100KHz, 50KHz, 25KHz, 20KHz
*Sampling rates at 4MHz and above will be dependent on system performance including the speed of your computer and the USB interface it is connected to.
HCTEST0006
Package contents include:
1 logic analyser device
1 USB cable
10 piece female to female DuPont cable
HCTEST00014
Package contents include:
1 logic analyser device
1 USB cable
10 piece female to female DuPont cable
10 way red Test Hook Clips
HCTEST00015
Package contents include:
1 logic analyser device
1 USB cable
10 piece female to female DuPont cable
10 way yellow Test Hook Clips
HCTEST00021
Package contents include:
1 logic analyser device
1 USB cable
10 piece female to female DuPont cable
40 way 2.54mm pitch Header Strip (will require soldering to the clips)
2 x Red Test Clips
2 x Blue Test Clips
2 x Green Test Clips
2 x Yellow Test Clips
2 x Black Test Clips
Sigrock PulseView Software:
UART Example:

Decoders:

JTAG Example:

Real Time Clock Example:

ARM ETMv3 Example:

EEPROM Example:

Z80 Example:

Example: Debuging SPI interface on an Uno+


Don't forget to check out out low cost analyser test clips that work great with this analyser.
Installation instructions (Windows Users):
Sigrok software:
The latest version of the Sigrok software can be downloaded from the official Sigrok website (sigrok.org). The latest Windows build of the PulseView (GUI) software can be downloaded here:
https://sigrok.org/wiki/Downloads
Drivers:
To use your analyser with the Sigrok software you will first need to install a driver. To do this you can use the Zadig driver install utility which is downloaded with the Sigrok Pulseview software:
1) Connect your analyser to the computer using the supplied USB cable. Windows will complain that it cannot find a driver but just ignore this message.
2) After downloading and installing the Sigrok Pulseview software the Zadig utility can be found in one of the following paths:
C:\Program Files (x86)\sigrok\PulseView\
OR
C:\Program Files\sigrok\PulseView\
3) Run the Zadig utility by double clicking the zadig.exe executable. Note, if you are using Windows XP then run the zadig_xp version instead.
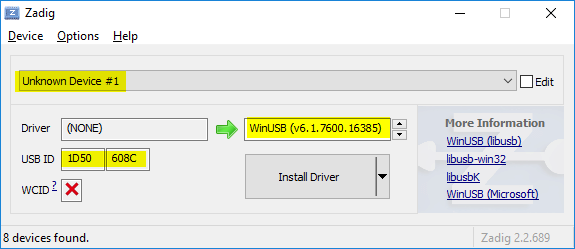
4) The Zadig utility should now open up. In the drop down box at the top of the window you should be able to select the analyser. It will normally be listed as 'Unknown Device #1'. If you don't see it listed then go to Options->List all devices and try the drop down box again. You can confirm that you have the right device selected by checking that the USB ID text box is showing the correct VID and PID (1D50 & 608C). Also make sure you have WinUSB (v6.1.xxx.xxxxx) selected for the driver driver version.
5) Click the 'Install Driver' button. This will automatically install a driver for the analyser. You can now close the Zadig window and run the pulseview software.
6) Disconnect the analyser and reconnect it before running pulseview. In Pulseview the analyser should appear at the top of the window as 'sigrok FX2 LA (8ch)'
Old driver instructions:
PLEASE NOTE: If you are experiencing problems installing the drivers please follow the guide at the bottom of this post. If it fails to resolve your issue then please contact support (at) hobbycomponents.com with your order number and we will try to resolve your issue.
As of 04/12/20015 we are now shipping this logic analyser with the Sigrok USB vendor and peripheral id (VID:1D50 PID:608C). If your analyser was purchased before this date we recommend trying the above Zadig install method first but note that the USB VID and PID for you analyser will be 04B4 and 8613 instead. Old driver and installation method is available below:
http://hobbycomponents.com/downloads/HC ... Driver.zip
Analysers purchased before this date are shipped with the defualt Cypress VID and PID (VID:04B4 PID:8613). For devices with this ID please use the following driver:
Windows 32/64 bit drivers for the analyser can be downloaded here:
http://hobbycomponents.com/downloads/HC ... Driver.zip
Should you wish to re-flash or develop your own code for this analyser you can download the Cypress development tools directly from the Cypress website here:
http://www.cypress.com/?rID=14321
Solving USB problems:
If you are experiencing USB problems or problems with installing the driver there are a number of possible causes:
1) When first plugging the analyser into your computer it should appear as an 'Unknown Device'. If it fails to appear check the following:
Make sure the analyser is plugged directly into a USB port on your computer and not via a hub. If there are any unnecessary devices plugged into other ports then remove them and try again.
One of the most common causes of USB problems is the USB cable itself. If possible try a different USB cable.
2) If you are using a 64bit versions of windows 7 or above you may need to disable windows signed driver enforcement as it way interfere with the driver installation:
In windows 7 you can simply reboot and then press F8 as Windows begins to reboot to get the windows boot menu. Within this menu there is an option to temporarily disable driver enforcement. Select this option and then continue booting into windows and try again.
In Windows 8 & 10 hold down the shift key whilst selecting the reboot option on the Windows start menu. In the options that open up select 'Troubleshoot', then 'Advanced options' then 'Start-up Settings'. Next hit the restart button. Your computer will now reboot and will then present you with a list of options. Select option 7 'Disable driver signature enforcement'. Your computer will now reboot.
3) Check that the driver installed properly:
Open up device manager. If the driver installed properly you should see it listed as 'Hobby Components - Sigrok 8ch Analyser'.
Check that there is no warning icon next to it. Right click on it and select 'Properties'. In the window that opens up under the 'General' tab and check to see if there are any errors reported. Note that if you are using a 64bit version of windows and you installed the driver with driver enforcement enabled the driver may have not installed correctly but may still not show any errors.
Next click the 'Details' tab and in the drop-down box select 'Hardware Ids'. In the 'Value' window check that you see a VID value of 1D50 & PID of 608C.If you don't see these values then please constant us.
If you see any errors try reinstalling the driver but first remove the currently installed driver by:
In device manager right click the analyser and select 'Uninstall'. In the window that opens up click the 'Delete driver software for this device' checkbox and then click the OK button to uninstall the driver. If you installed the driver more than once you may need to repeat this step to remove every version. If you are using a 64bit version of Windows 7/8/10 then please pay attention to step 2.
4) If the above steps fail you can try to force a driver install using Zidag installer that comes as part of PulseView. It should be located in: C:\Program Files\sigrok\PulseView\zadig.exe
Run this program and a driver install window will pop up. In the drop down box you should be able to see the analyser. If not select Options->List all devices and try the drop down box again. When you select the device you can confirm that you have the right one selected by checking that the USB ID text box is showing the correct VID and PID (1D50 & 608C). Also make sure you have WinUSB (v6.1.xxx.xxxxx) selected for the driver type and then click the 'Install WCID Driver button'. This will force install a driver for the analyser.
5) If after checking the above steps and the driver appears to have installed properly but the Analyser is not appearing in PulseView, or PulseView is reporting an error please supply us with a log file by following these steps:
Download and install the command line version of the sigrok software here:
http://sigrok.org/jenkins/job/sigrok-cr ... taller.exe
Open up a Windows command window and type the following with the Analyser plugged in:
c:\Program Files\sigrok\sigrok-cli\sigrok-cli -d fx2lafw -c samplerate=1mhz --samples 1m -o c:\test\foo.sr -l 5
Where c:\test should be an empty directory where you have write permissions. The path to where you have the sigrok cli installed may vary depending on your version of Windows.
Please cut and past the log that appears in the command window.
Installation instructions (Linux Users):
Please note that due the wide range of Linux distributions and setups we are unable to provide support for the Linux version of the Sigrok software. Also we do not provide any guarantees that the following guide will work for your setup. This guide was tested on a clean Ubuntu (Debian) install.
Step 1: Follow all the instructions to install the Sigrok software from the following Sigrok webpage here:
http://sigrok.org/wiki/Linux
Make sure you follow all the steps for your version of Linux to install the following software libserialport, libsigrok, libsigrokdecode, sigrok-cli, & PulseView
Step 2: You will now need to add a USB VID/PID entry into the udev rules file (z60_libsigrok.rules) for the logic analyser. If you downloaded the Sigrok files in the above step to your home folder then the required file will be in a location similar to this:
/home/username/libsigrok/contrib/
Open the file called z60_libsigrok.rules in a text editor.
The last line should look like this:
Code: Select all
LABEL="libsigrok_rules_end"Code: Select all
#Hobby Components 8 channel logic analyser (HCTEST0006)
#& 16 channnel logic analyser (HCTEST0022)
ATTRS{idVendor}=="1d50", ATTRS{idProduct}=="608c", MODE="664", GROUP="plugdev"
ATTRS{idVendor}=="1d50", ATTRS{idProduct}=="608d", MODE="664", GROUP="plugdev"
Next copy this file to the following path:
Code: Select all
[/etc/udev/rules.d/ (or where-ever your distribution stores udev rules files).Restart udev with the following:
Code: Select all
sudo /etc/init.d/udev restartStep 3: You will to install the fx2lafw firmaware which is used by the analyser. Instructions on how to build the firmware can be found here:
http://sigrok.org/wiki/Linux
However, there are also pre-built versions of the file which can be downloaded from here:
http://sigrok.org/download/binary/sigro ... e-fx2lafw/
Simply download the latest version and un-compress the files to the following location:
Code: Select all
/home/username/.local/share/sigrok-firmwareStep 4: If everything has installed correctly you should be able to run PulseView by simply typing:
Code: Select all
pulseviewIf you get an generic error or an error stating that the analyser cannot be found/firmware cannot be uploaded, try rebooting your system. If this doesn't resolve the problem run the following sigrok-cli command which will provide more information and may give you a clue as to what is causing the issue:
Code: Select all
sigrok-cli -d fx2lafw -c samplerate=1mhz --samples 1m -o foo.sr -l 5
Raspberry Pi Users:
Many thanks to marl_scot for providing this guide . The original post can be found here:
viewtopic.php?f=102&t=1411&start=80
Disclaimer: Please note that this guide has not been tested by Hobby Components therefore following these steps is at your own risk. We do not provide any guarantees or warranties as to its suitability.
Using Raspbian GNU/Linux 9
log into the pi via SSH/GUI
If using the GUI, then open a terminal.
type :
Code: Select all
sudo apt-get install autoconf autoconf-archive automake check cmake default-jdk doxygen g++ gcc git-core libboost-filesystem-dev libboost-serialization-dev libboost-system-dev libboost-test-dev libftdi1-dev libglib2.0-dev libglibmm-2.4 dev libqt5svg5-dev libtool libusb-1.0-0-dev libzip-dev make pkg-config python3-dev python-dev python-gi-dev python-numpy python-setuptools qtbase5-dev swig wget sdcc
Code: Select all
ln /usr/lib/jvm/java-8-openjdk-armhf/jre/lib/arm/client /usr/lib/jvm/java-8-openjdk-armhf/jre/lib/arm/server -sand then repeat the above apt-get command (apt will carry on from where it was).
Follow the instructions on this page https://sigrok.org/wiki/Linux to compile the software, I have included the commands below to make it easier for copy/paste
Code: Select all
cd ~
git clone git://sigrok.org/libserialport
cd libserialport
./autogen.sh
./configure
make
sudo make install
Code: Select all
cd ~
git clone git://sigrok.org/libsigrok
cd libsigrok
./autogen.sh
./configure
make
sudo make install
Code: Select all
cd ~
git clone git://sigrok.org/libsigrokdecode
cd libsigrokdecode
./autogen.sh
./configure
make
sudo make install
Code: Select all
cd ~
git clone git://sigrok.org/sigrok-cli
cd sigrok-cli
./autogen.sh
./configure
make
sudo make install
Code: Select all
cd ~
git clone git://sigrok.org/pulseview
cd pulseview
cmake .
make
sudo make install
Code: Select all
cd ~
git clone git://sigrok.org/sigrok-firmware-fx2lafw
cd sigrok-firmware-fx2lafw
./autogen.sh
./configure
make
make install
Code: Select all
cd ~
sudo cp libsigrok/contrib/60-libsigrok.rules  /etc/udev/rules.d/
sudo cp libsigrok/contrib/61-libsigrok-plugdev.rules /etc/udev/rules.d/To run the software, open a terminal and type :
Code: Select all
pulseviewThis will show a 4 step dialog :
Step 1 : You should select the 'fx2lafw' driver
Step 2 : Make sure 'USB' is selected
Step 3 : Click on 'Scan for devices using the driver above'
Step 4 : Select the 'sigrok FX2 LA (8ch) with 8 channels' device
and click 'OK'
You should now be able to use the logic probe and the software
FAQ:
Can I use 2 logic analysers at the same time to capture more than 8 inputs?
Yes it is possible to use 2 logic analysers in parallel however, this can only be done by running 2 copies of the Sigrok software and pointing each copy to one of the analysers. There is no way to link two copies of the software together so a capture will need to be started individually on each copy of the software. The captured data will then need to be manually aligned.
Also note that running more than one logic analyser at the same time may be dependent on your computer's hardware and USB bandwidth. For reference it has been tested to work on a AMD Ryzen 5 3600 with a Gigabyte B450M motherboard with no issues.